> ## Documentation Index
> Fetch the complete documentation index at: https://docs.rntor.com/docs/llms.txt
> Use this file to discover all available pages before exploring further.
# members
## Who is a member
A **member** is a customer who regularly uses your space's services and has been granted access to the members-only parts of the location. Members typically hold an active subscription, can book resources, pay invoices, and use credits or day passes.
Each member has a profile under **Customers** that includes their contact details, subscription, assigned resources, credit and day-pass balances, billing history, internal notes, and activity timeline.
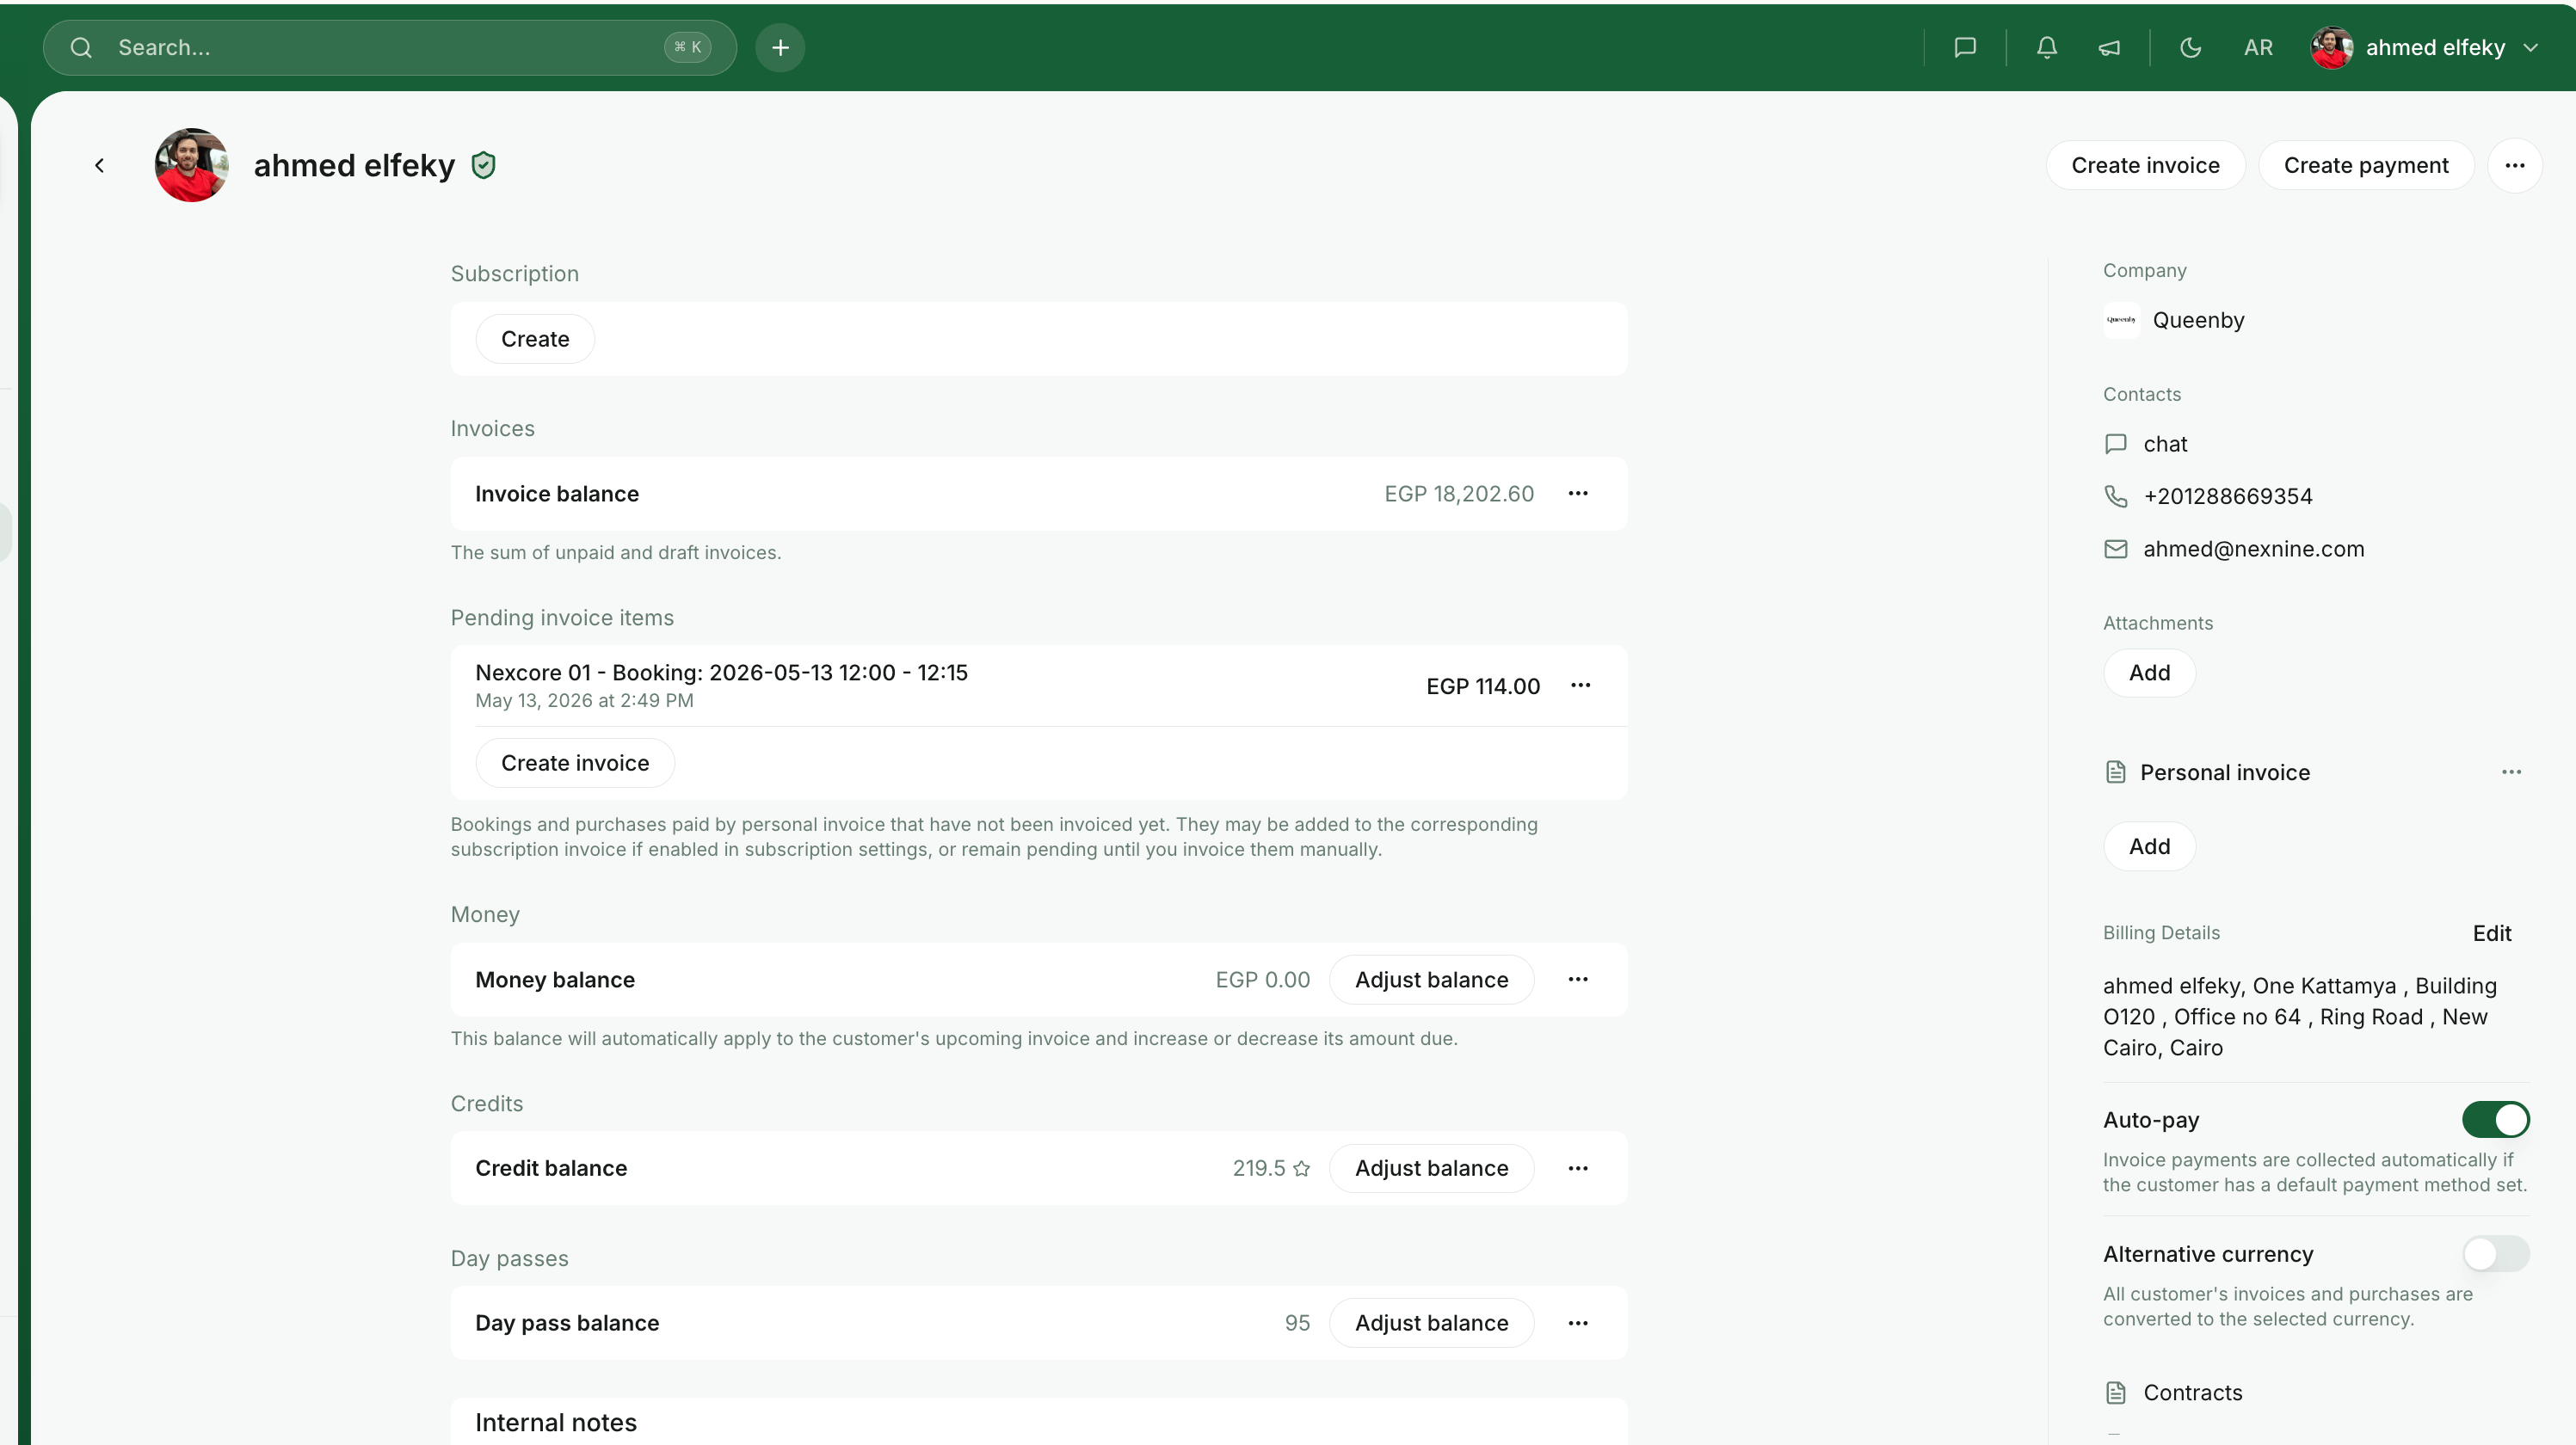 Screenshot placeholder — replace with the latest RNTOR member profile screenshot.
## Invite a member
Administrators can invite an unlimited number of members to each location. There are several ways to bring a new member in:
* Send an individual invitation
* Mass invite members from a spreadsheet
* Approve a request to join the location
### Prerequisites
Before inviting a user, make sure you have the right access and the right information:
1. Log in as an administrator of the location where you want to invite the user. You need the **Customers** permission to manage that page. See [Permissions](/docs/admin/administration/administrators/permissions).
2. Collect the following info: **first name**, last name (optional), **email**, and phone number (optional).
### Send an individual invitation
1. Go to the **Customers** page in the location where you want to invite the user, then press `Invite user` in the top right.
Screenshot placeholder — replace with the latest RNTOR member profile screenshot.
## Invite a member
Administrators can invite an unlimited number of members to each location. There are several ways to bring a new member in:
* Send an individual invitation
* Mass invite members from a spreadsheet
* Approve a request to join the location
### Prerequisites
Before inviting a user, make sure you have the right access and the right information:
1. Log in as an administrator of the location where you want to invite the user. You need the **Customers** permission to manage that page. See [Permissions](/docs/admin/administration/administrators/permissions).
2. Collect the following info: **first name**, last name (optional), **email**, and phone number (optional).
### Send an individual invitation
1. Go to the **Customers** page in the location where you want to invite the user, then press `Invite user` in the top right.
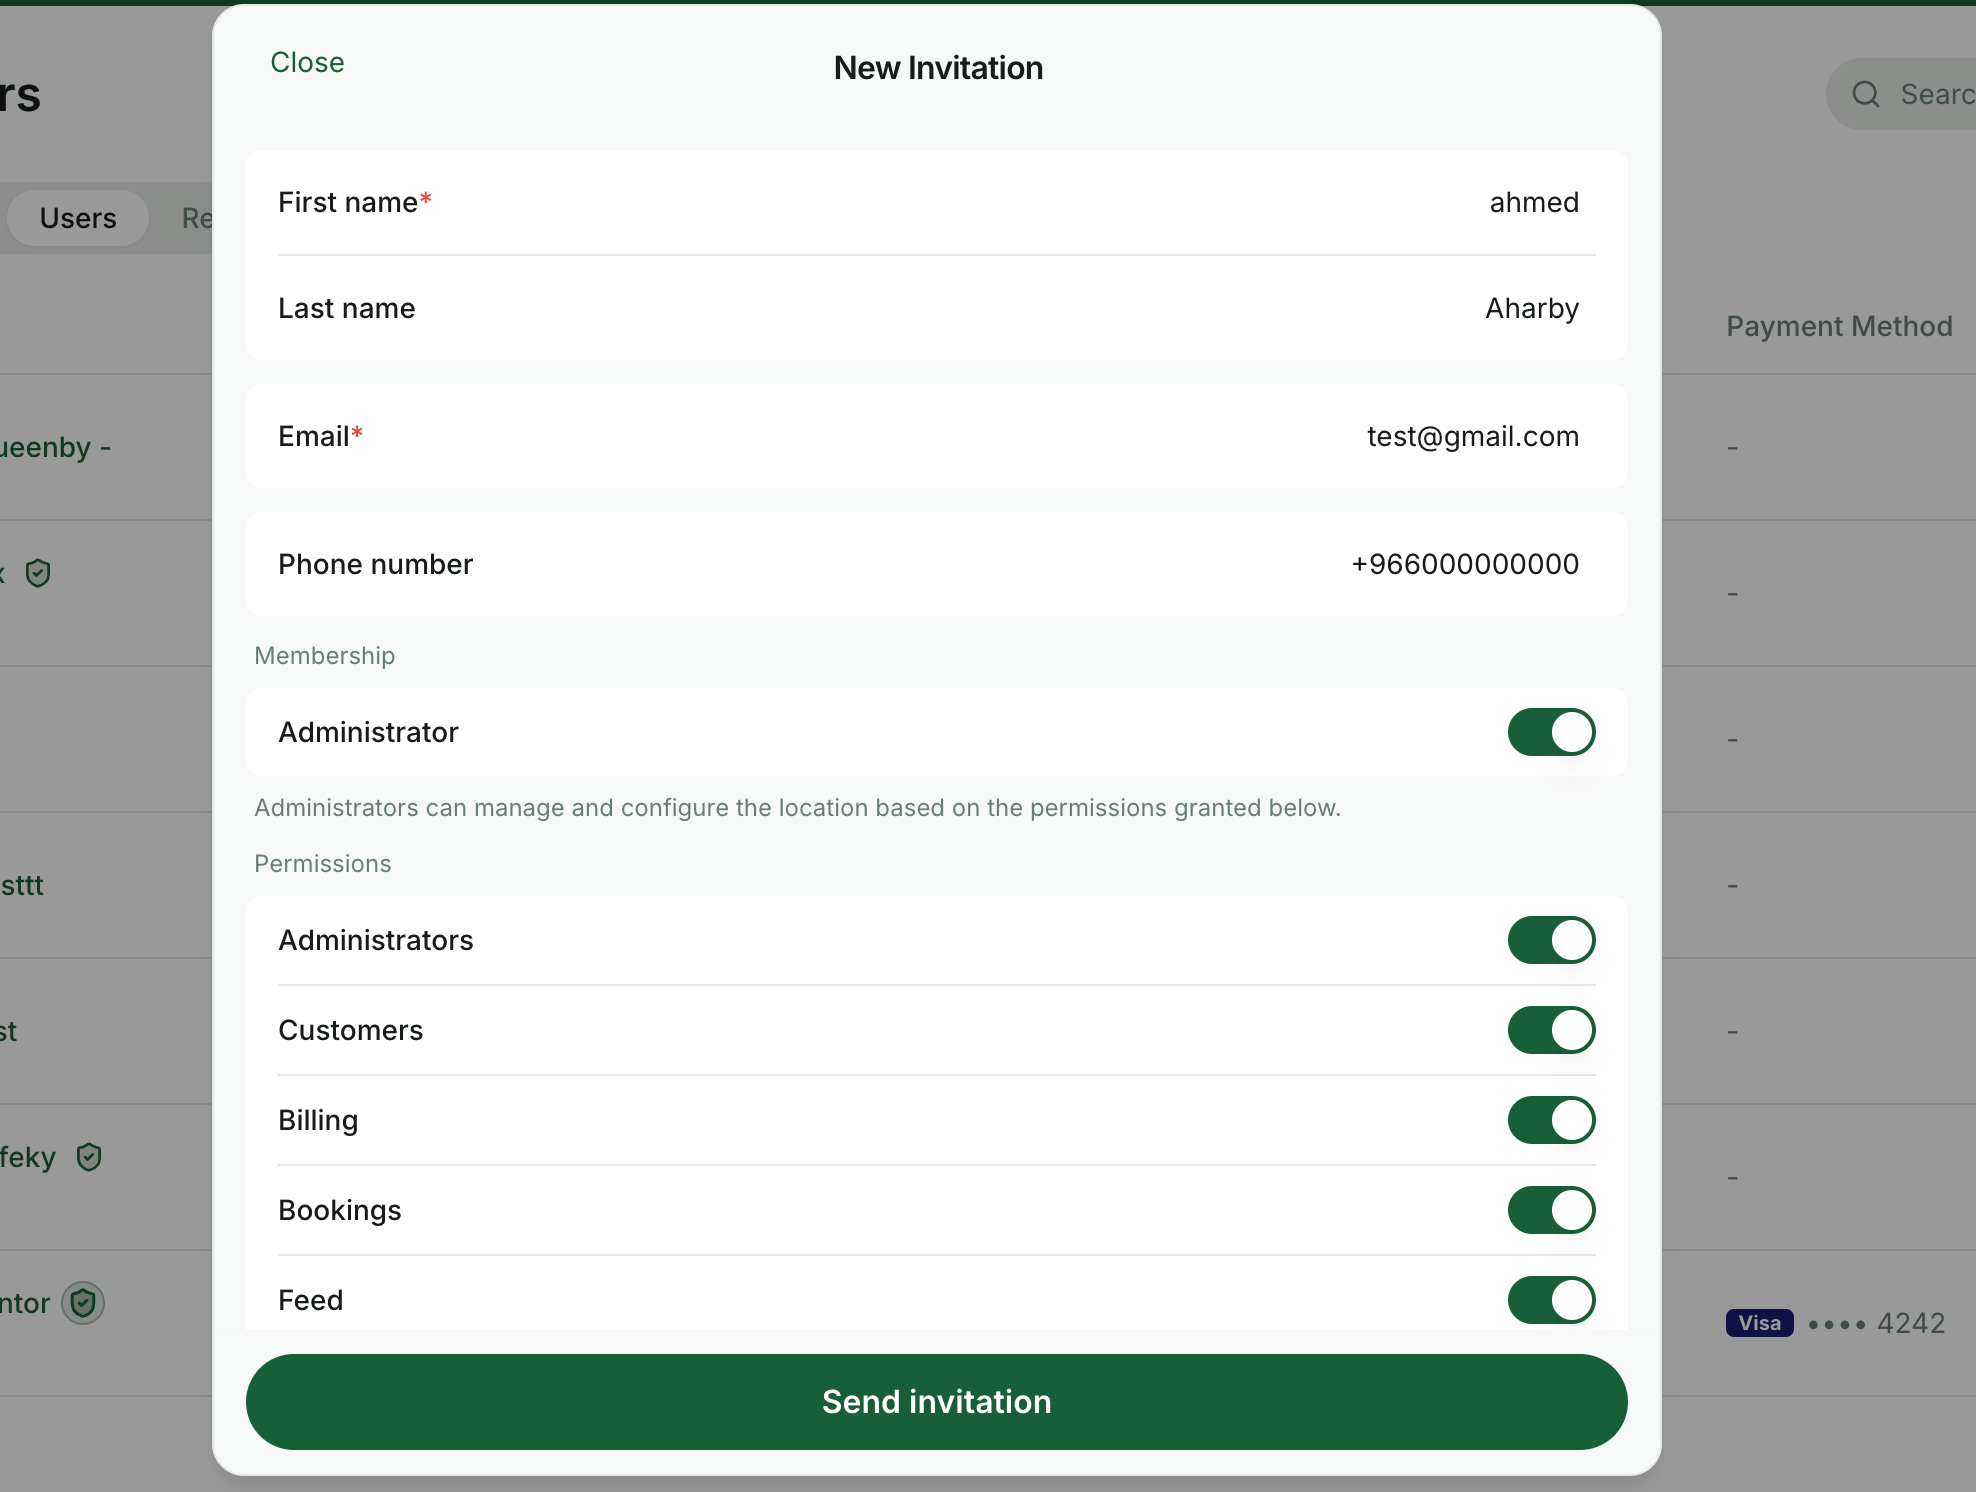 2. Fill in the user's details.
* If you're inviting an administrator, enable the **Administrator** switch and [configure their permissions](/docs/admin/administration/administrators/permissions).
* If the user belongs to a company, select the company and toggle **Manager** if they should manage the company profile.
2. Fill in the user's details.
* If you're inviting an administrator, enable the **Administrator** switch and [configure their permissions](/docs/admin/administration/administrators/permissions).
* If the user belongs to a company, select the company and toggle **Manager** if they should manage the company profile.
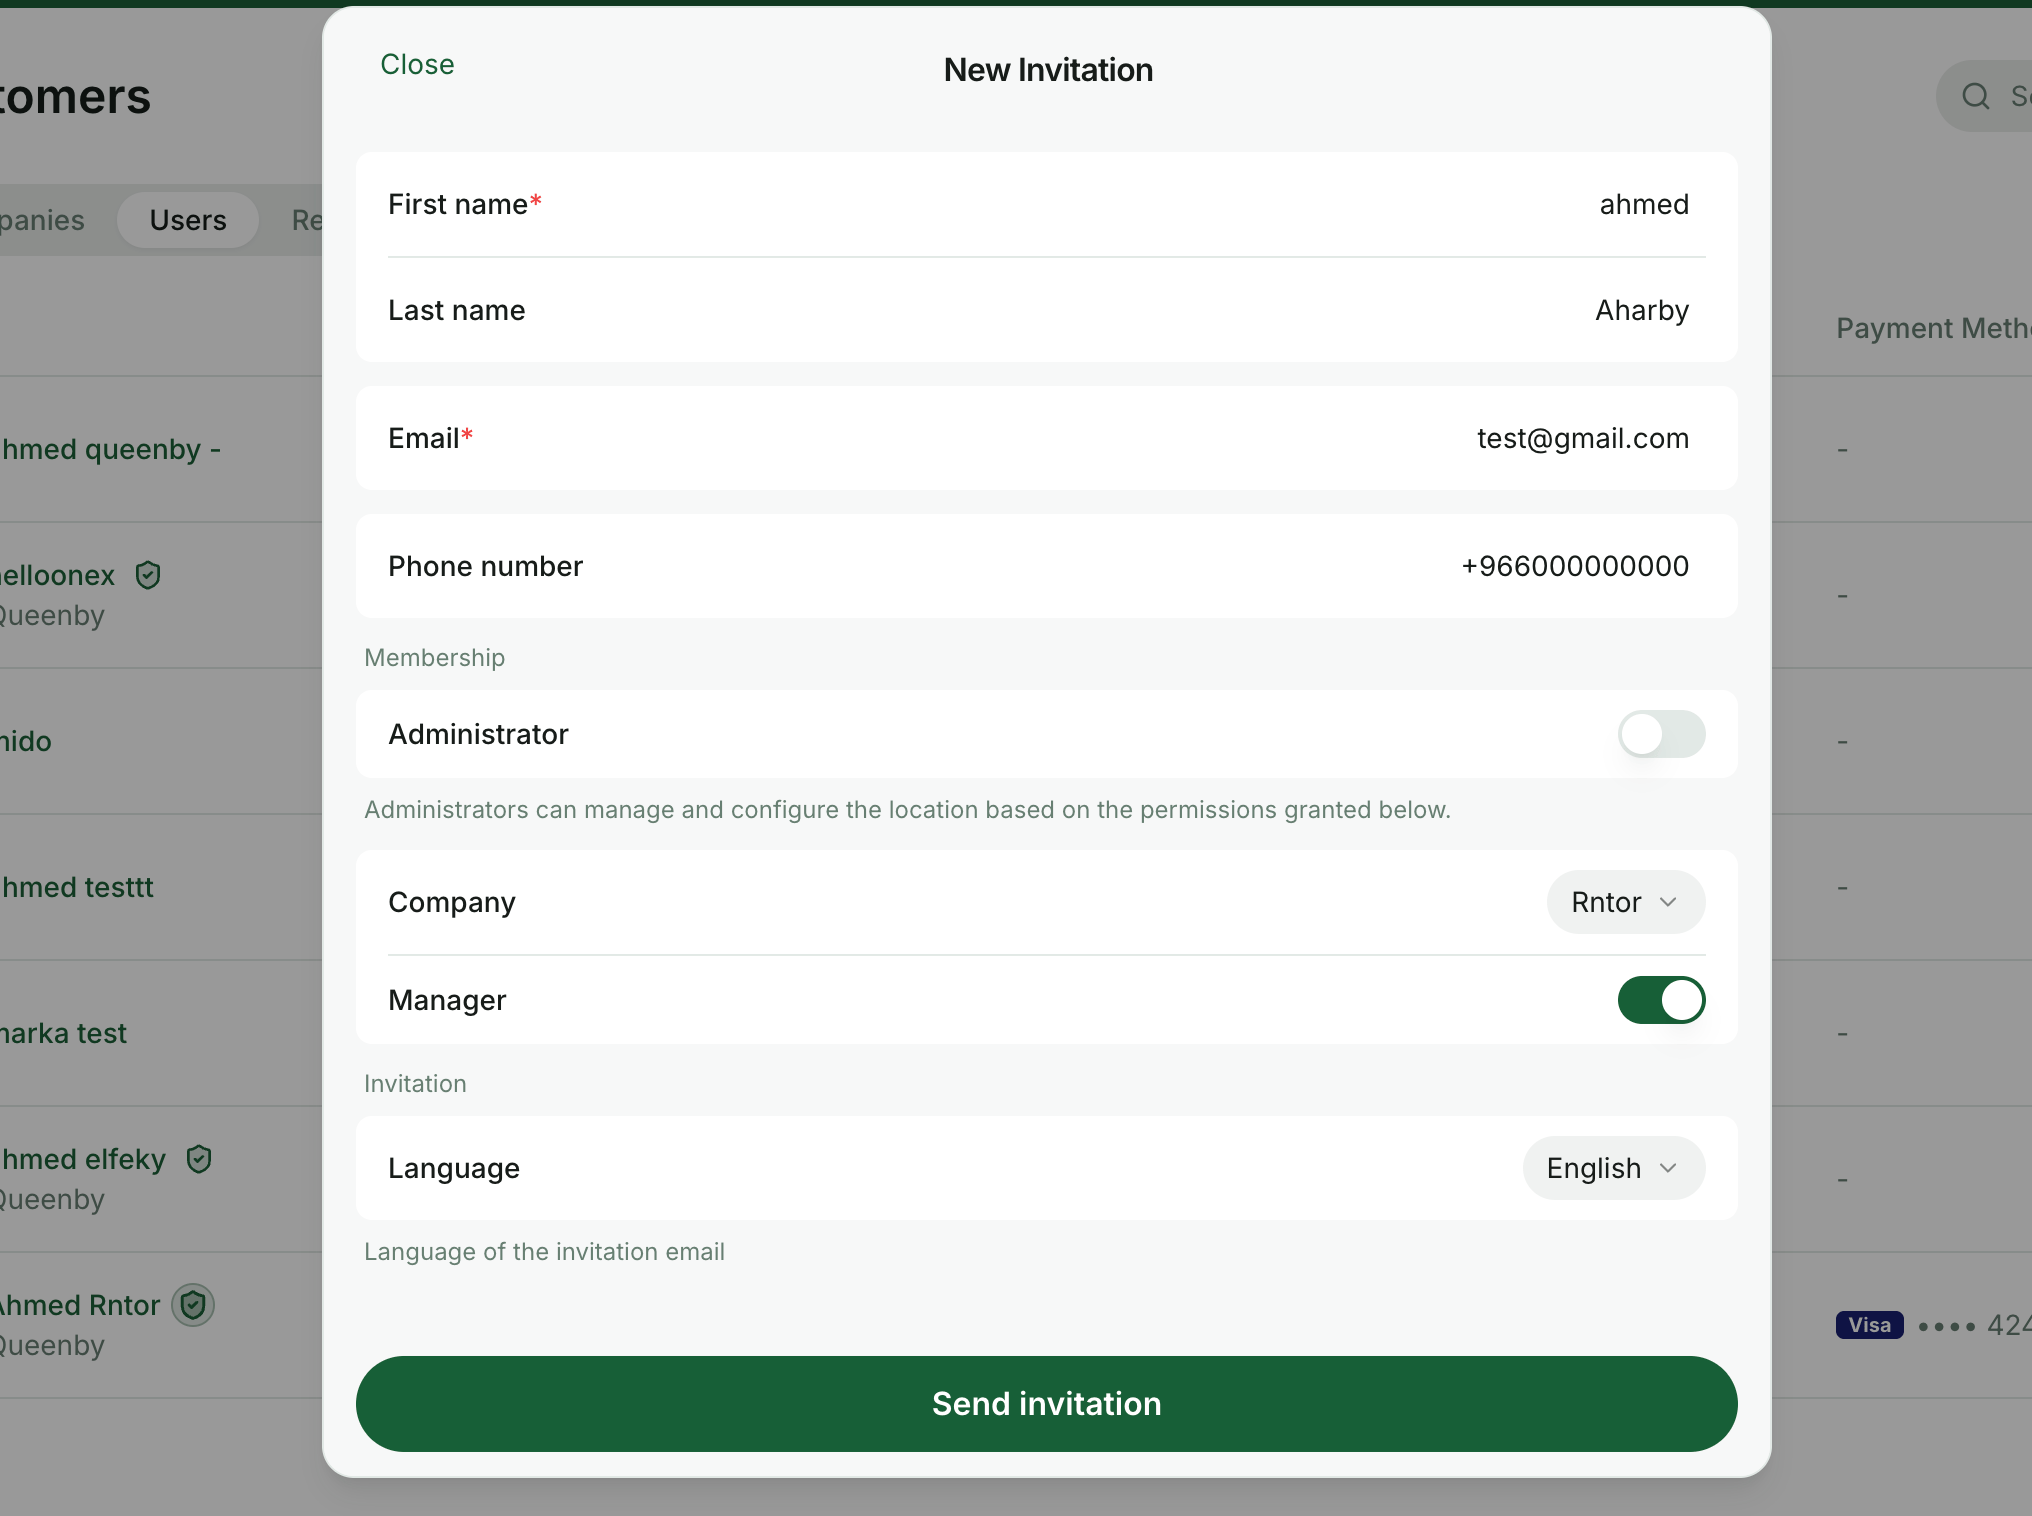 3. Click `Send invitation`. The user's creation date will appear in their profile under the **Activity** section.
 ### How a user gets an invitation
When an administrator sends the invitation (or approves a request to join), the user receives an invitation email to activate their account. You can keep the default email or [customize the template](/docs/admin/general/customize-emails).
### How a user gets an invitation
When an administrator sends the invitation (or approves a request to join), the user receives an invitation email to activate their account. You can keep the default email or [customize the template](/docs/admin/general/customize-emails).
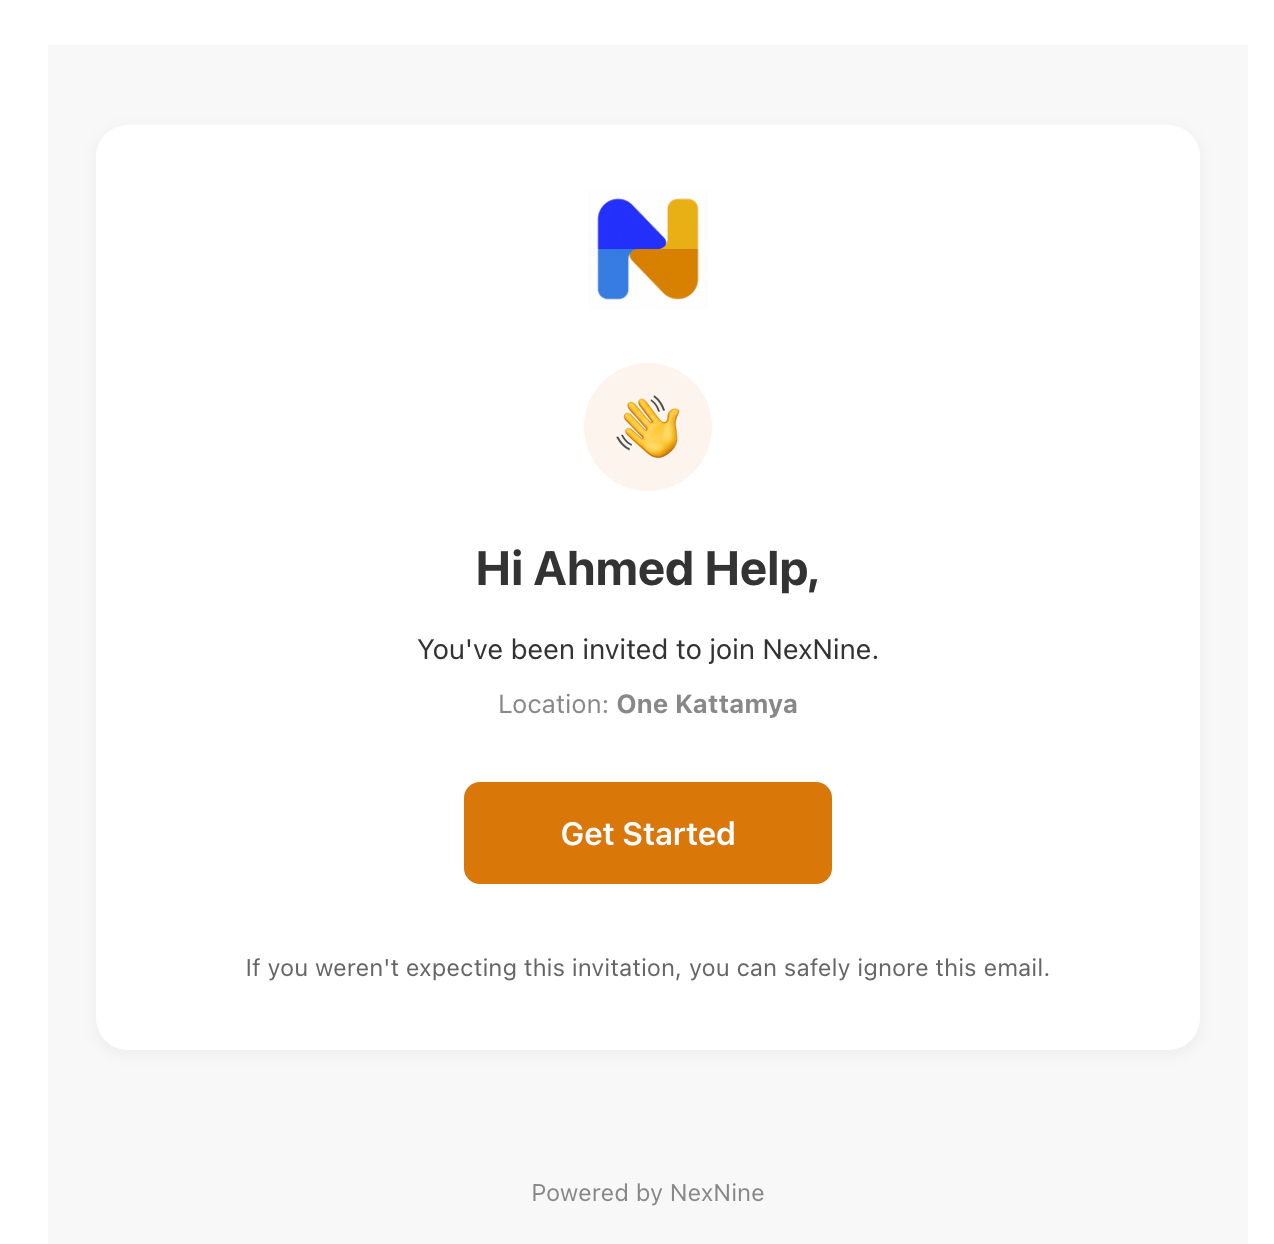 The user presses `Get started` and is taken to the **member portal** or the **member mobile app**. If they follow the link within 24 hours, they're signed in automatically without any extra verification. After that window, they go through the regular login flow.
Users who haven't activated their account within 3 days after being invited receive an automatic reminder, if invitation reminders are enabled in your location's email settings.
## Invite multiple members
You can invite many users at once and assign them to specific companies. This saves time compared to inviting each user one by one.
Before sending mass invitations, gather the data and prepare any companies or plans you'll need to reference.
### Prepare companies and plans
If your new users belong to companies or should have a subscription on creation, set those up first:
* [How to create a company](/docs/admin/customer-management/companies/set-up-companies)
* [How to create a plan](/docs/admin/billing/plans/set-up-plans)
If some companies need a unique plan (for example, a custom price for their office), you don't need to create that plan separately. You can [create a custom subscription](/docs/admin/billing/subscriptions/set-up-subscriptions) for those companies after the users are invited.
### Prepare user data
Prepare a spreadsheet with the following columns:
| Column name | Required |
| ------------------------------------------------ | -------- |
| First name | ✓ |
| Last name | |
| Email | ✓ |
| Phone number | |
| Company ID (if the user belongs to a company) | |
| Plan ID (if the user should have a subscription) | |
Make sure every email is unique — RNTOR uses email as the unique user identifier.
To find a **Company ID**, open the **Customers** page → **Companies** tab → open the company and copy its ID from the profile.
To find a **Plan ID**, go to **Location settings → Plans**, open the plan's `...` menu and select **Copy public link**. The last part of the URL is the plan ID. If the plan has **Sign-up** disabled, temporarily enable it to copy the link and then disable it again.
If you plan to seed users with credits or day passes, make sure [credits](/docs/admin/billing/credits-and-day-passes/credits) and [day passes](/docs/admin/billing/credits-and-day-passes/day-passes) are enabled and your plans are configured accordingly.
### Send mass invitations
#### To individual users
1. Go to the **Customers** page and tap the `...` menu in the top right corner.
2. Choose `Invite multiple users`.
The user presses `Get started` and is taken to the **member portal** or the **member mobile app**. If they follow the link within 24 hours, they're signed in automatically without any extra verification. After that window, they go through the regular login flow.
Users who haven't activated their account within 3 days after being invited receive an automatic reminder, if invitation reminders are enabled in your location's email settings.
## Invite multiple members
You can invite many users at once and assign them to specific companies. This saves time compared to inviting each user one by one.
Before sending mass invitations, gather the data and prepare any companies or plans you'll need to reference.
### Prepare companies and plans
If your new users belong to companies or should have a subscription on creation, set those up first:
* [How to create a company](/docs/admin/customer-management/companies/set-up-companies)
* [How to create a plan](/docs/admin/billing/plans/set-up-plans)
If some companies need a unique plan (for example, a custom price for their office), you don't need to create that plan separately. You can [create a custom subscription](/docs/admin/billing/subscriptions/set-up-subscriptions) for those companies after the users are invited.
### Prepare user data
Prepare a spreadsheet with the following columns:
| Column name | Required |
| ------------------------------------------------ | -------- |
| First name | ✓ |
| Last name | |
| Email | ✓ |
| Phone number | |
| Company ID (if the user belongs to a company) | |
| Plan ID (if the user should have a subscription) | |
Make sure every email is unique — RNTOR uses email as the unique user identifier.
To find a **Company ID**, open the **Customers** page → **Companies** tab → open the company and copy its ID from the profile.
To find a **Plan ID**, go to **Location settings → Plans**, open the plan's `...` menu and select **Copy public link**. The last part of the URL is the plan ID. If the plan has **Sign-up** disabled, temporarily enable it to copy the link and then disable it again.
If you plan to seed users with credits or day passes, make sure [credits](/docs/admin/billing/credits-and-day-passes/credits) and [day passes](/docs/admin/billing/credits-and-day-passes/day-passes) are enabled and your plans are configured accordingly.
### Send mass invitations
#### To individual users
1. Go to the **Customers** page and tap the `...` menu in the top right corner.
2. Choose `Invite multiple users`.
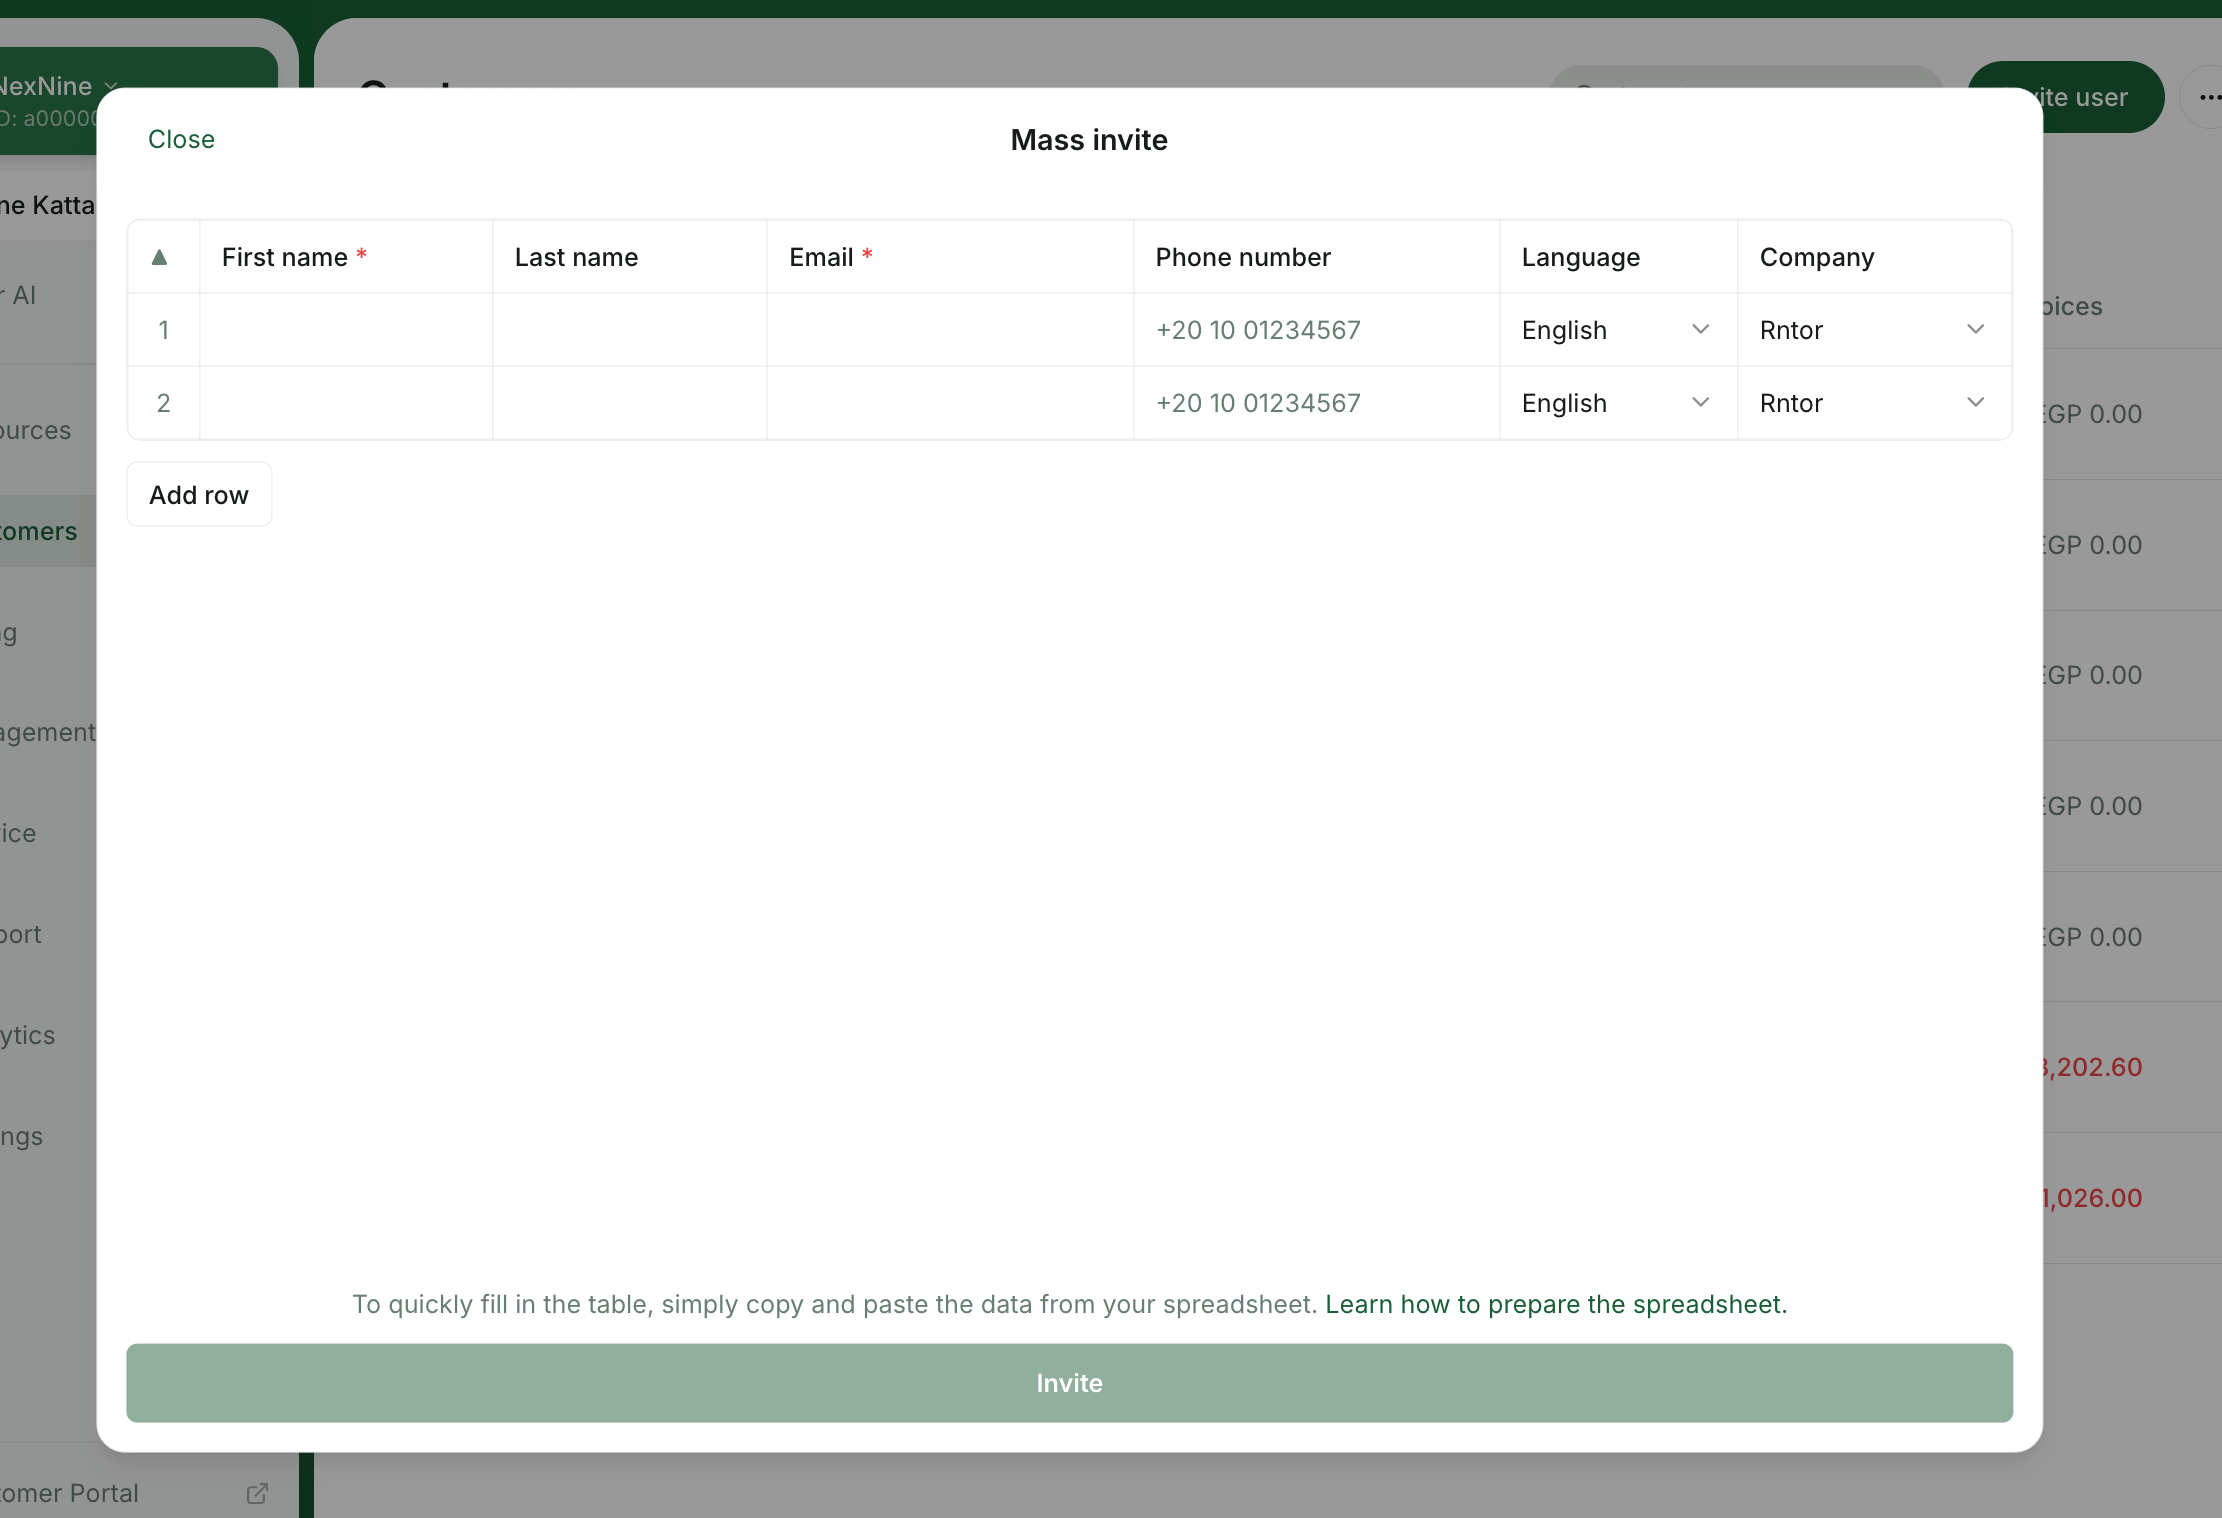 3. Copy the rows from your spreadsheet and paste them into the mass invitation window. Configure the other fields, such as invitation language, company, and plan, if needed.
4. Press `Invite`.
If your users should have a subscription, add the **plan ID**, **start date**, and **renewal** to the spreadsheet. RNTOR will create those subscriptions automatically.
#### To company users
To invite users into a specific company:
1. Go to the **Customers** page and open the company.
2. Press `Mass invite` under the company name.
3. Fill in the required details and click `Invite`. Invitations are sent immediately.
3. Copy the rows from your spreadsheet and paste them into the mass invitation window. Configure the other fields, such as invitation language, company, and plan, if needed.
4. Press `Invite`.
If your users should have a subscription, add the **plan ID**, **start date**, and **renewal** to the spreadsheet. RNTOR will create those subscriptions automatically.
#### To company users
To invite users into a specific company:
1. Go to the **Customers** page and open the company.
2. Press `Mass invite` under the company name.
3. Fill in the required details and click `Invite`. Invitations are sent immediately.
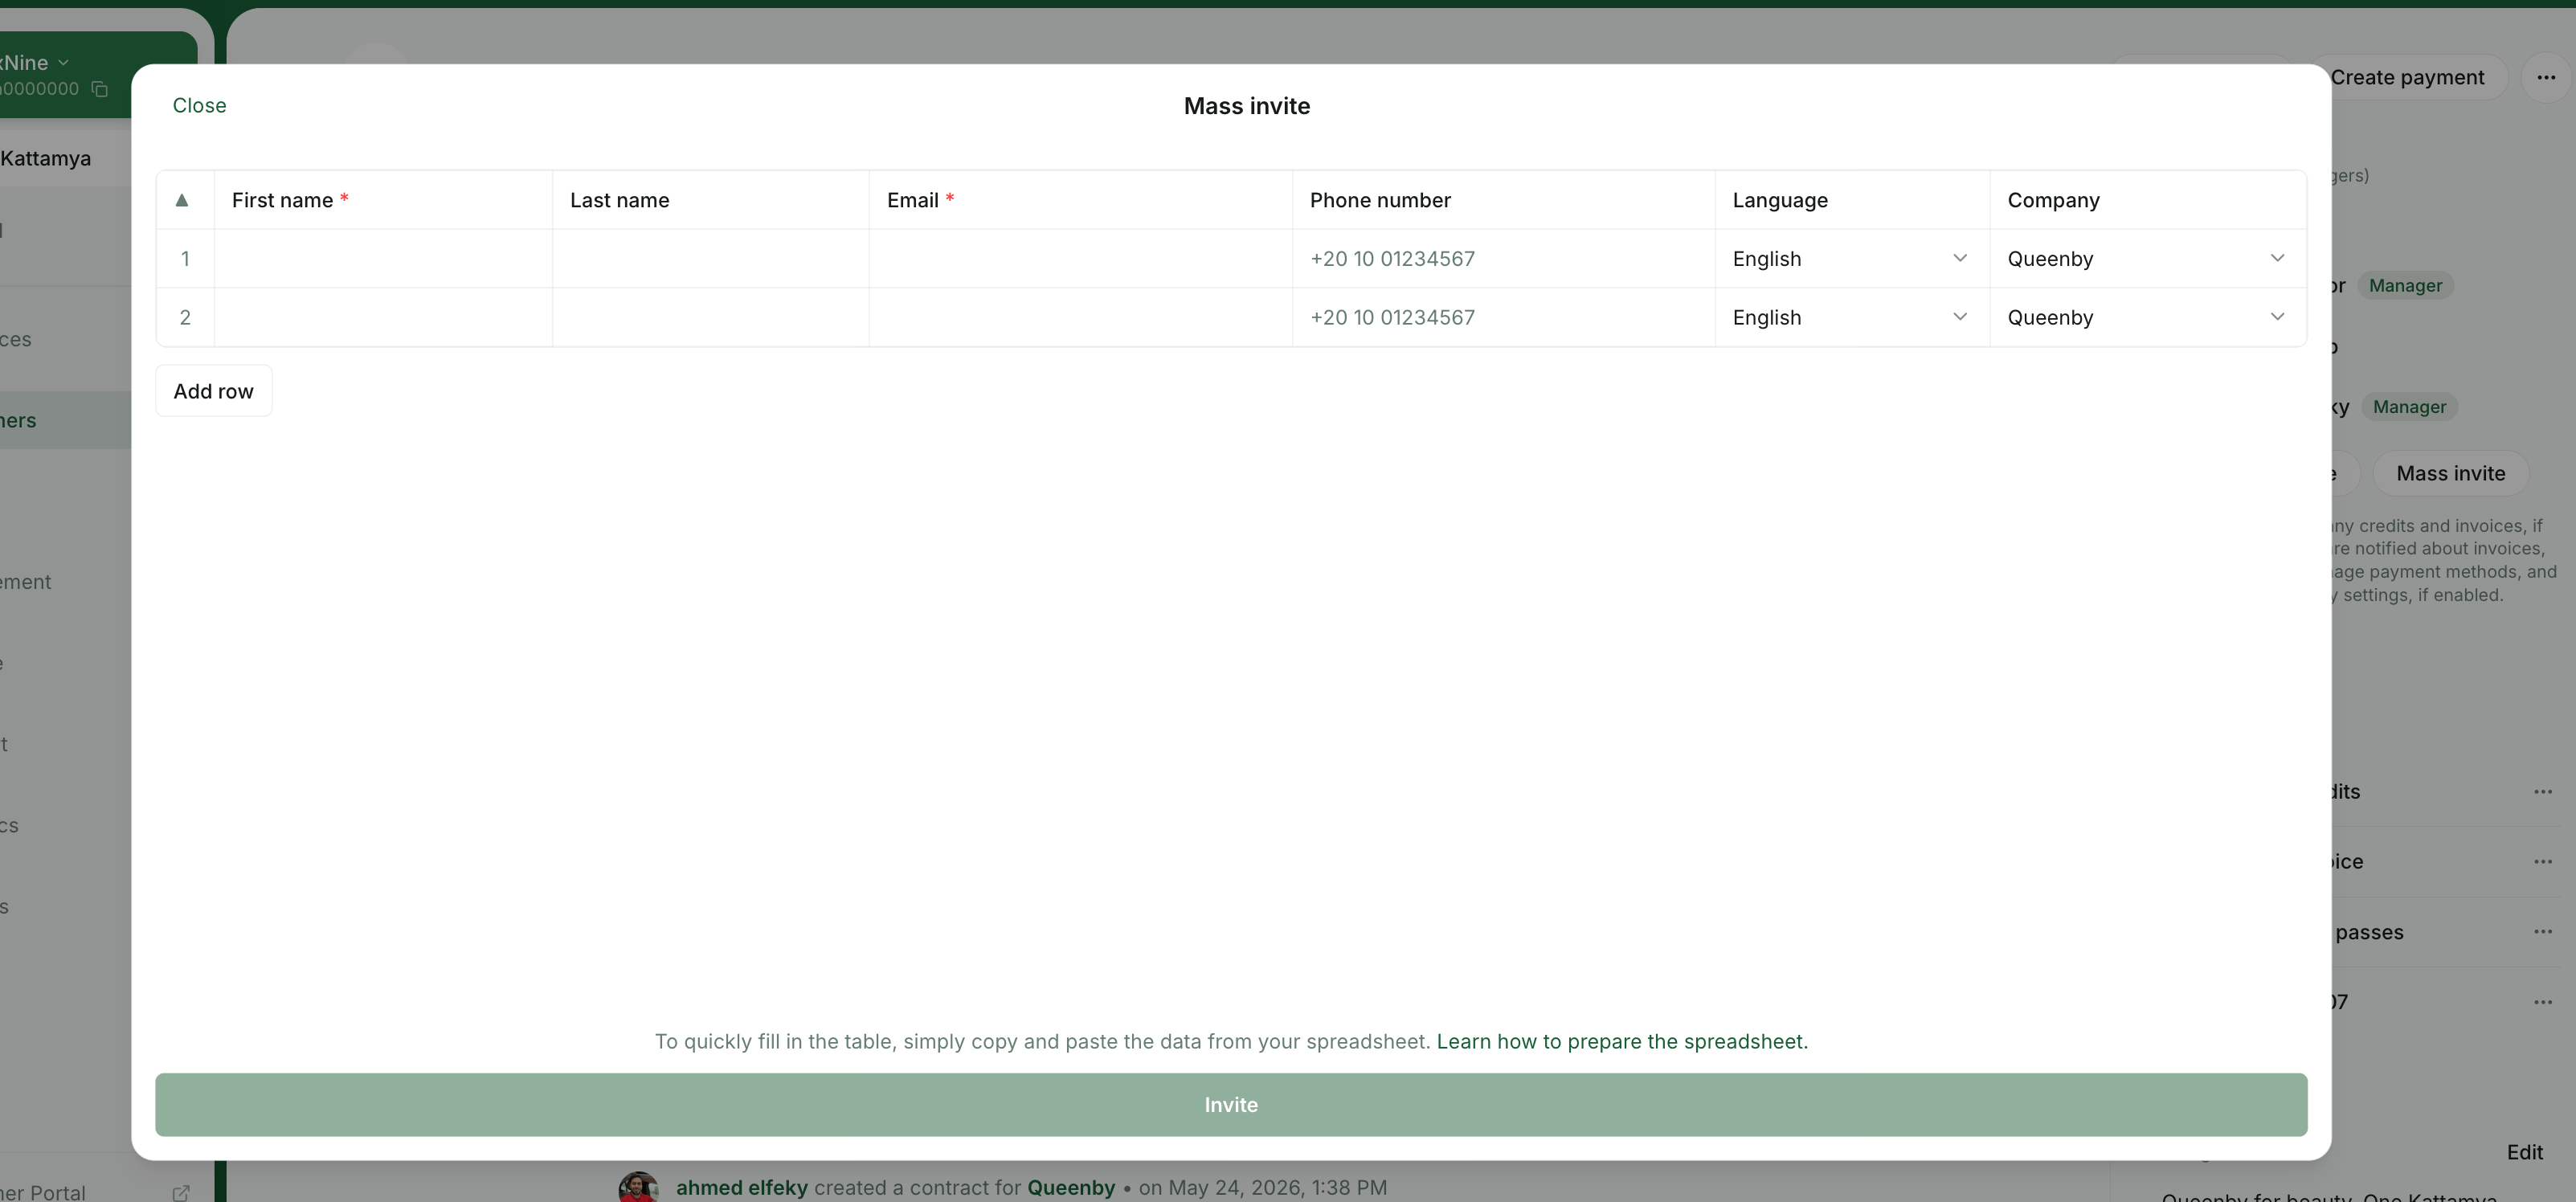 You'll see a confirmation on screen and a **New** label next to each freshly invited user on the **Customers** page → **Users** tab.
To invite users across **different** companies in one go:
1. Include the **Company ID** column in your spreadsheet.
2. Go to **Customers** → `...` → `Invite multiple users`.
3. Paste the rows and press `Invite`.
Once users are linked to companies, [select company managers](/docs/admin/customer-management/companies/company-members-and-managers) and [create company subscriptions](/docs/admin/billing/subscriptions/set-up-subscriptions) as needed.
Mass invitations create only **personal** subscriptions for users. Use company subscriptions afterward for company-level plans.
## What a member can do
A member of your location can:
* View and interact with content that has **Location members** (or higher) visibility
* Receive and pay invoices
* Use and buy credits
* Use and buy day passes
* Hold a subscription and use all perks included in their plan
* Book resources according to their plan and permissions
Members count toward your subscription only once they're active — that is, once they sign in to the member portal or mobile app at least once.
Members who also belong to a **company** get a few extra capabilities:
* Use the company's shared credits and day passes
* Access perks granted by the company subscription
* Manage company details if they are set as a **Manager**
* Invite other users to the location, if allowed by the company manager role
## Manage members
Members are always listed on the **Customers** page. Administrators can view past activity for every member, including bookings, payments, invoices, credits, and day passes.
You can:
* [Remove a user from the location](/docs/admin/customer-management/users/remove-users)
* Group or ungroup users within [companies](/docs/admin/customer-management/companies/set-up-companies)
* Manage their [billing details](/docs/admin/customer-management/billing-details) and [billing history](/docs/admin/customer-management/billing)
* Manage assigned resources (desks, offices, etc.)
* Add internal **Notes** and **Attachments** (e.g., verification documents)
* Send and manage [contracts](/docs/admin/billing/contracts/set-up-contracts)
## FAQs
At its core, RNTOR isn't a CRM platform. It's a comprehensive platform for space management — covering customer management, billing, payments, resources, services, and providing a member portal for bookings, payments, and interactions.
That said, RNTOR includes the **Customers** page as one of its modules, which has all the essential CRM-like functionality to help you manage both leads and customers effectively. Specifically, the **Customers** page allows you to:
1. List and manage [**Members**](/docs/admin/customer-management/users/members) (regular customers, typically with subscriptions), [**Nonmembers**](/docs/admin/customer-management/users/nonmembers) (occasional customers), and [**Companies**](/docs/admin/customer-management/companies/set-up-companies) (with associated members) profiles.
2. In each customer profile, you can set, track, and manage the customer's:
* [Subscription](/docs/admin/billing/subscriptions/set-up-subscriptions) and [billing](/docs/admin/customer-management/billing)
* Assigned resources (desks, offices, etc.)
* [Credits](/docs/admin/billing/credits-and-day-passes/credits) and [day passes](/docs/admin/billing/credits-and-day-passes/day-passes)
* Contract-based start and end dates
* Internal **Notes** and **Attachments** (e.g., verification documents)
* [Contracts](/docs/admin/billing/contracts/set-up-contracts)
3. Profiles of members and nonmembers also include the history of their purchases:
* Bookings
* Event tickets and shop orders
* Benefit applications
4. You can [invite members](#invite-a-member), add nonmembers, [remove customers](/docs/admin/customer-management/users/remove-users), and use auto-remove rules to automatically move members to nonmembers when their subscription ends.
5. Gain insights with the [Analytics](/docs/admin/analytics-reports/dashboards) page and [custom reports](/docs/admin/analytics-reports/reports) based on customer activity.
If you're looking for a dedicated, advanced CRM system, RNTOR connects to popular CRM platforms via its [integrations](/docs/admin/integrations/set-up-integrations).
[Remove the user profile](/docs/admin/customer-management/users/remove-users) and reinvite them with the correct email address.
When you invite a user with a specific name and email address, their account is automatically created. Once the account is created, only the user themselves can manage their personal information. To resolve this, ask the user to edit their name from their **Account** page in the member portal.
To invite a member from one location to another locationinvite a member from one location to another location, do the following:
1. Go to the **Customers** page.
2. Open the user's profile.
3. Hover next to the user's name at the top of the page and click `>`Hover next to the user's name at the top of the page and click `>`.
You'll see a confirmation on screen and a **New** label next to each freshly invited user on the **Customers** page → **Users** tab.
To invite users across **different** companies in one go:
1. Include the **Company ID** column in your spreadsheet.
2. Go to **Customers** → `...` → `Invite multiple users`.
3. Paste the rows and press `Invite`.
Once users are linked to companies, [select company managers](/docs/admin/customer-management/companies/company-members-and-managers) and [create company subscriptions](/docs/admin/billing/subscriptions/set-up-subscriptions) as needed.
Mass invitations create only **personal** subscriptions for users. Use company subscriptions afterward for company-level plans.
## What a member can do
A member of your location can:
* View and interact with content that has **Location members** (or higher) visibility
* Receive and pay invoices
* Use and buy credits
* Use and buy day passes
* Hold a subscription and use all perks included in their plan
* Book resources according to their plan and permissions
Members count toward your subscription only once they're active — that is, once they sign in to the member portal or mobile app at least once.
Members who also belong to a **company** get a few extra capabilities:
* Use the company's shared credits and day passes
* Access perks granted by the company subscription
* Manage company details if they are set as a **Manager**
* Invite other users to the location, if allowed by the company manager role
## Manage members
Members are always listed on the **Customers** page. Administrators can view past activity for every member, including bookings, payments, invoices, credits, and day passes.
You can:
* [Remove a user from the location](/docs/admin/customer-management/users/remove-users)
* Group or ungroup users within [companies](/docs/admin/customer-management/companies/set-up-companies)
* Manage their [billing details](/docs/admin/customer-management/billing-details) and [billing history](/docs/admin/customer-management/billing)
* Manage assigned resources (desks, offices, etc.)
* Add internal **Notes** and **Attachments** (e.g., verification documents)
* Send and manage [contracts](/docs/admin/billing/contracts/set-up-contracts)
## FAQs
At its core, RNTOR isn't a CRM platform. It's a comprehensive platform for space management — covering customer management, billing, payments, resources, services, and providing a member portal for bookings, payments, and interactions.
That said, RNTOR includes the **Customers** page as one of its modules, which has all the essential CRM-like functionality to help you manage both leads and customers effectively. Specifically, the **Customers** page allows you to:
1. List and manage [**Members**](/docs/admin/customer-management/users/members) (regular customers, typically with subscriptions), [**Nonmembers**](/docs/admin/customer-management/users/nonmembers) (occasional customers), and [**Companies**](/docs/admin/customer-management/companies/set-up-companies) (with associated members) profiles.
2. In each customer profile, you can set, track, and manage the customer's:
* [Subscription](/docs/admin/billing/subscriptions/set-up-subscriptions) and [billing](/docs/admin/customer-management/billing)
* Assigned resources (desks, offices, etc.)
* [Credits](/docs/admin/billing/credits-and-day-passes/credits) and [day passes](/docs/admin/billing/credits-and-day-passes/day-passes)
* Contract-based start and end dates
* Internal **Notes** and **Attachments** (e.g., verification documents)
* [Contracts](/docs/admin/billing/contracts/set-up-contracts)
3. Profiles of members and nonmembers also include the history of their purchases:
* Bookings
* Event tickets and shop orders
* Benefit applications
4. You can [invite members](#invite-a-member), add nonmembers, [remove customers](/docs/admin/customer-management/users/remove-users), and use auto-remove rules to automatically move members to nonmembers when their subscription ends.
5. Gain insights with the [Analytics](/docs/admin/analytics-reports/dashboards) page and [custom reports](/docs/admin/analytics-reports/reports) based on customer activity.
If you're looking for a dedicated, advanced CRM system, RNTOR connects to popular CRM platforms via its [integrations](/docs/admin/integrations/set-up-integrations).
[Remove the user profile](/docs/admin/customer-management/users/remove-users) and reinvite them with the correct email address.
When you invite a user with a specific name and email address, their account is automatically created. Once the account is created, only the user themselves can manage their personal information. To resolve this, ask the user to edit their name from their **Account** page in the member portal.
To invite a member from one location to another locationinvite a member from one location to another location, do the following:
1. Go to the **Customers** page.
2. Open the user's profile.
3. Hover next to the user's name at the top of the page and click `>`Hover next to the user's name at the top of the page and click `>`.
 4. Click `...` top right → `Invite as member...` or `Add as nonmember...` → select the necessary locationClick `...` top right → `Invite as member...` or `Add as nonmember...` → select the necessary location.
5. The user will get an email inviting them to join the new location and will have member access to the new location under the same account immediately. They won't need to log in again or take any other action to gain accessThe user will get an email inviting them to join the new location and will have member access to the new location under the same account immediately. They won't need to log in again or take any other action to gain access.
6. If the customer has a subscription in the first location, [set the "End date"](/docs/admin/billing/subscriptions/set-up-subscriptions) for their subscription to schedule its cancellation or cancel it immediately and [create a subscription](/docs/admin/billing/subscriptions/set-up-subscriptions) for them in the new locationIf the customer has a subscription in the first location, [set the "End date"](/docs/admin/billing/subscriptions/set-up-subscriptions) for their subscription to schedule its cancellation or cancel it immediately and [create a subscription](/docs/admin/billing/subscriptions/set-up-subscriptions) for them in the new location.
7. Remove [the user](/docs/admin/customer-management/users/remove-users) or company from the **Customers** of the previous location to make them nonmembers at that location.
4. Click `...` top right → `Invite as member...` or `Add as nonmember...` → select the necessary locationClick `...` top right → `Invite as member...` or `Add as nonmember...` → select the necessary location.
5. The user will get an email inviting them to join the new location and will have member access to the new location under the same account immediately. They won't need to log in again or take any other action to gain accessThe user will get an email inviting them to join the new location and will have member access to the new location under the same account immediately. They won't need to log in again or take any other action to gain access.
6. If the customer has a subscription in the first location, [set the "End date"](/docs/admin/billing/subscriptions/set-up-subscriptions) for their subscription to schedule its cancellation or cancel it immediately and [create a subscription](/docs/admin/billing/subscriptions/set-up-subscriptions) for them in the new locationIf the customer has a subscription in the first location, [set the "End date"](/docs/admin/billing/subscriptions/set-up-subscriptions) for their subscription to schedule its cancellation or cancel it immediately and [create a subscription](/docs/admin/billing/subscriptions/set-up-subscriptions) for them in the new location.
7. Remove [the user](/docs/admin/customer-management/users/remove-users) or company from the **Customers** of the previous location to make them nonmembers at that location.