> ## Documentation Index
> Fetch the complete documentation index at: https://docs.rntor.com/docs/llms.txt
> Use this file to discover all available pages before exploring further.
# issue-invoices
Learn how to issue recurring invoices for leases and memberships automatically and how to manually create one-off invoices for custom charges
An invoice is an official billing document that shows the products or services provided to a customer, their prices, and the total amount due. It serves as both a payment request and a financial record.
You can find all invoices under **Billing > Invoices**, as well as on the **Invoices** page in each customer's profile.
In RNTOR, invoices can be issued in three ways:
## Invoices for rentals or memberships
For customers renting a space or purchasing a membership for a specific period:
1. Go to **Customers** and open the customer's profile.
2. [Create a subscription](/docs/admin/billing/subscriptions/set-up-subscriptions#create-a-subscription).
The subscription automatically generates invoices according to the configured billing cycle, period, items, quantities, and prices. It can create a single invoice or continue issuing recurring invoices throughout the subscription period.
## Invoices for one-off purchases
For purchases such as resource bookings, event tickets, and Shop orders:
1. The customer completes the purchase through the member web portal or mobile app and [pays through a payment gateway](/docs/admin/billing/payments/payment-gateway). 2. Alternatively, an administrator can create a one-off booking for the customer using the [External payment method](/docs/admin/billing/payments/external). 3. RNTOR automatically generates the corresponding one-off invoice.
## Manual one-off invoices
For occasional charges that are not connected to a subscription, rental, booking, or another specific purchase, administrators can manually create a one-off invoice for any customer.
1. Go to **Billing > Invoices**, or open the customer's profile.
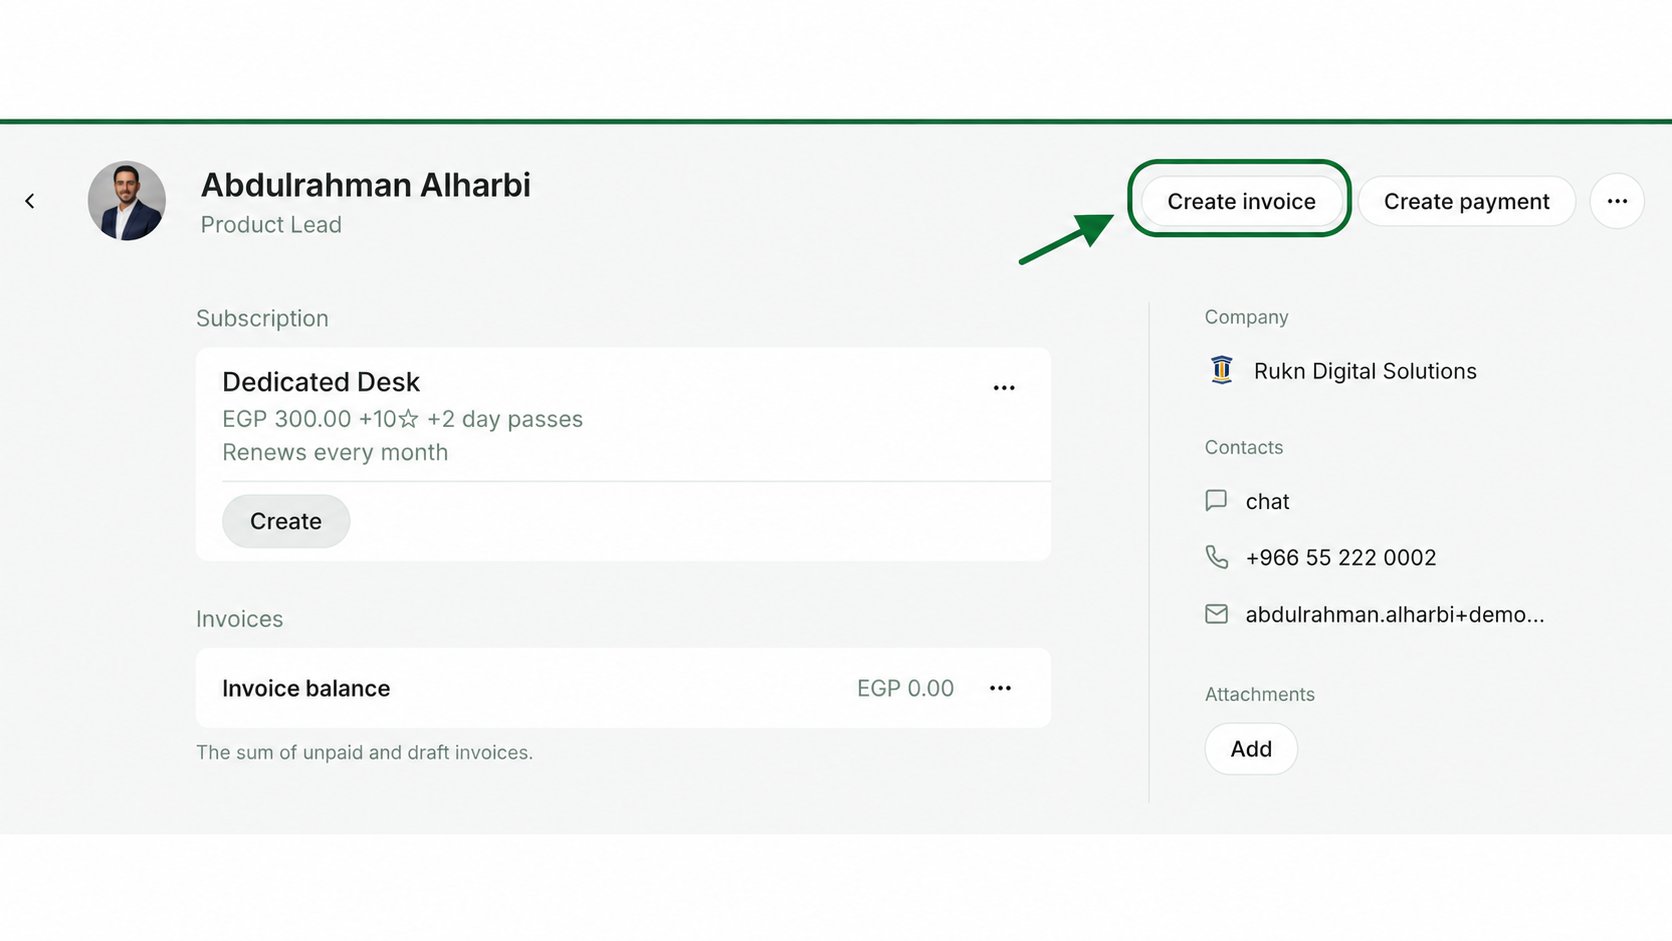
2. Click **Create invoice** in the top-right corner.
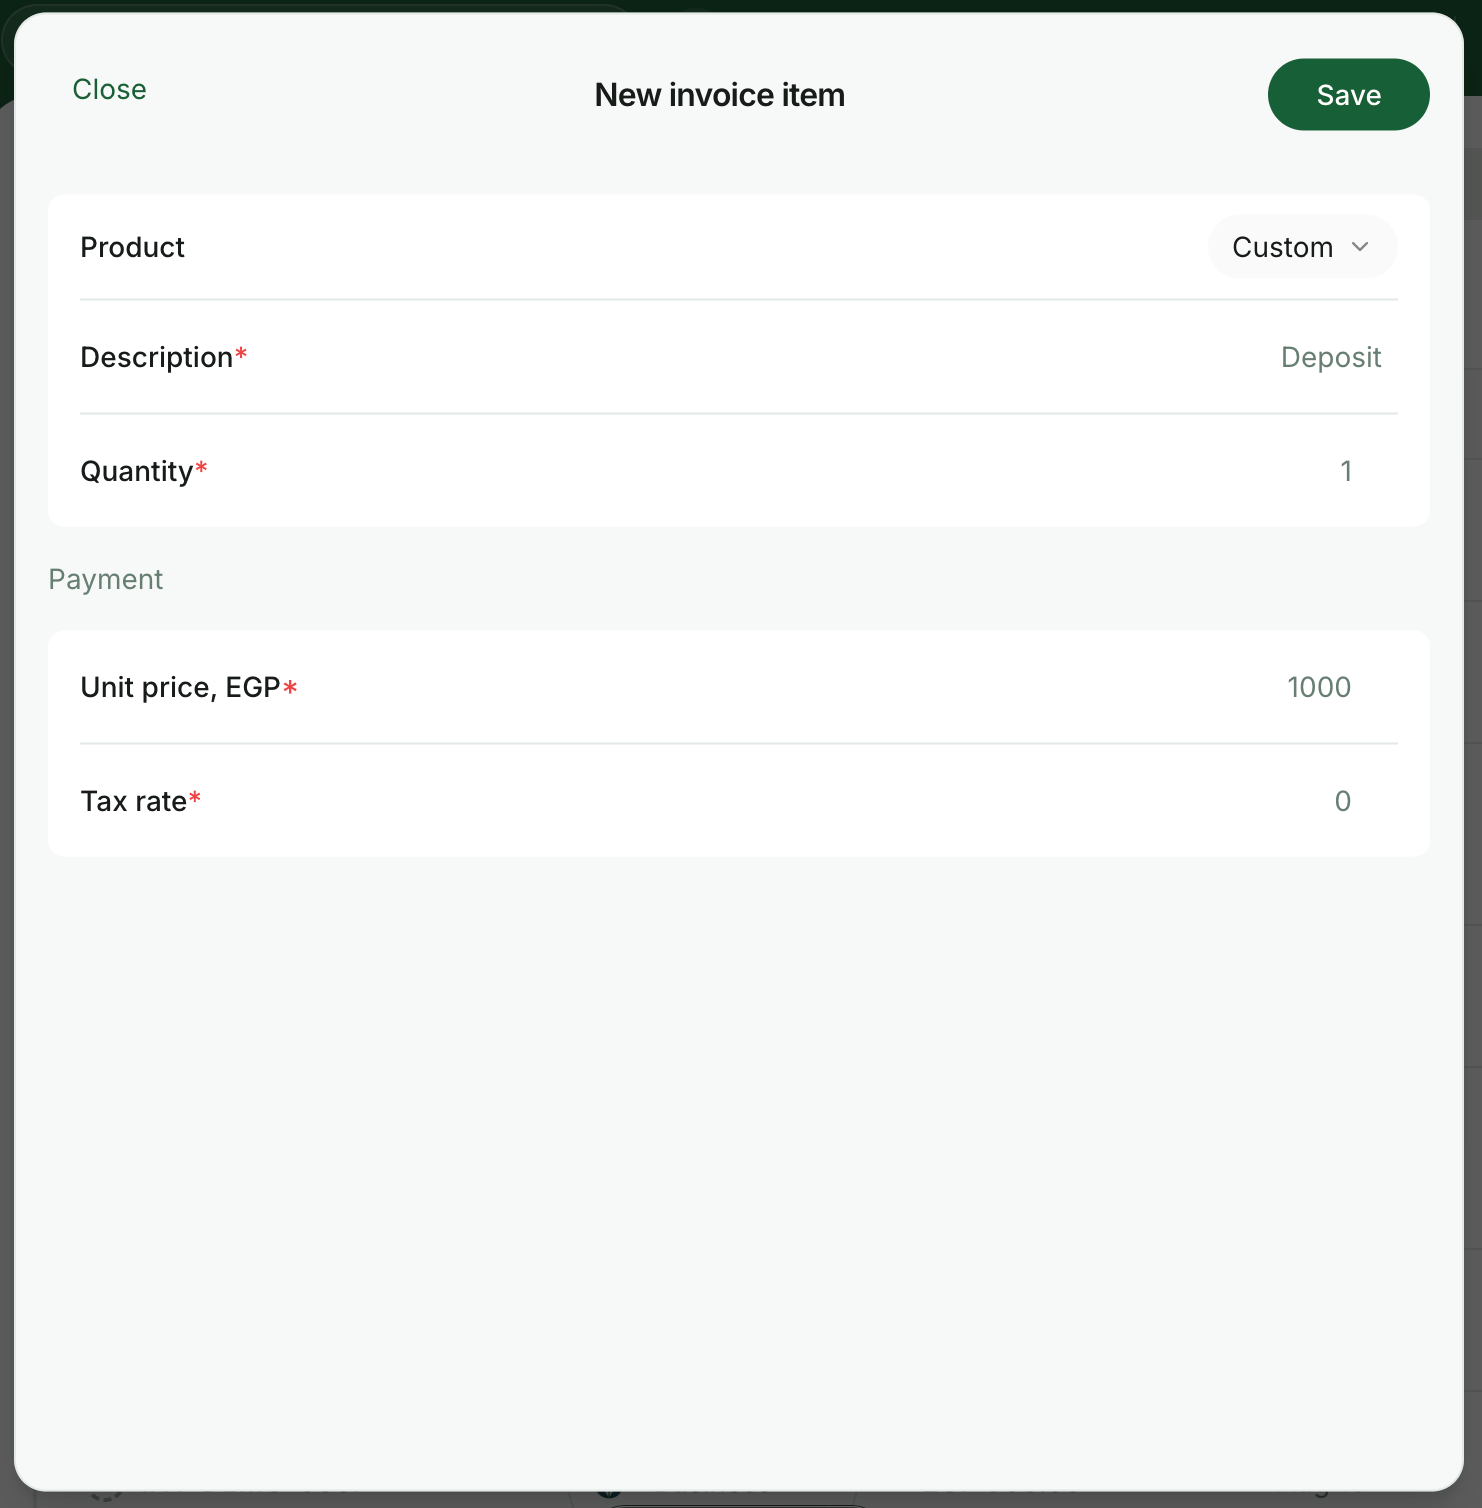
 3. Click **Add**. In the **Product** field, select an existing product or keep **Custom** selected to enter a unique item and price.
4. Enter the **Quantity**, complete the remaining fields, and click **Save**.
3. Click **Add**. In the **Product** field, select an existing product or keep **Custom** selected to enter a unique item and price.
4. Enter the **Quantity**, complete the remaining fields, and click **Save**.
 5. Optionally, add an internal note for your team's payment records and [set a custom payment due date](/docs/admin/billing/invoices/invoice-due-date#customize-the-payment-due-value-for-the-invoice). Then click **Create**.
6. Click **View invoice** in the confirmation message.
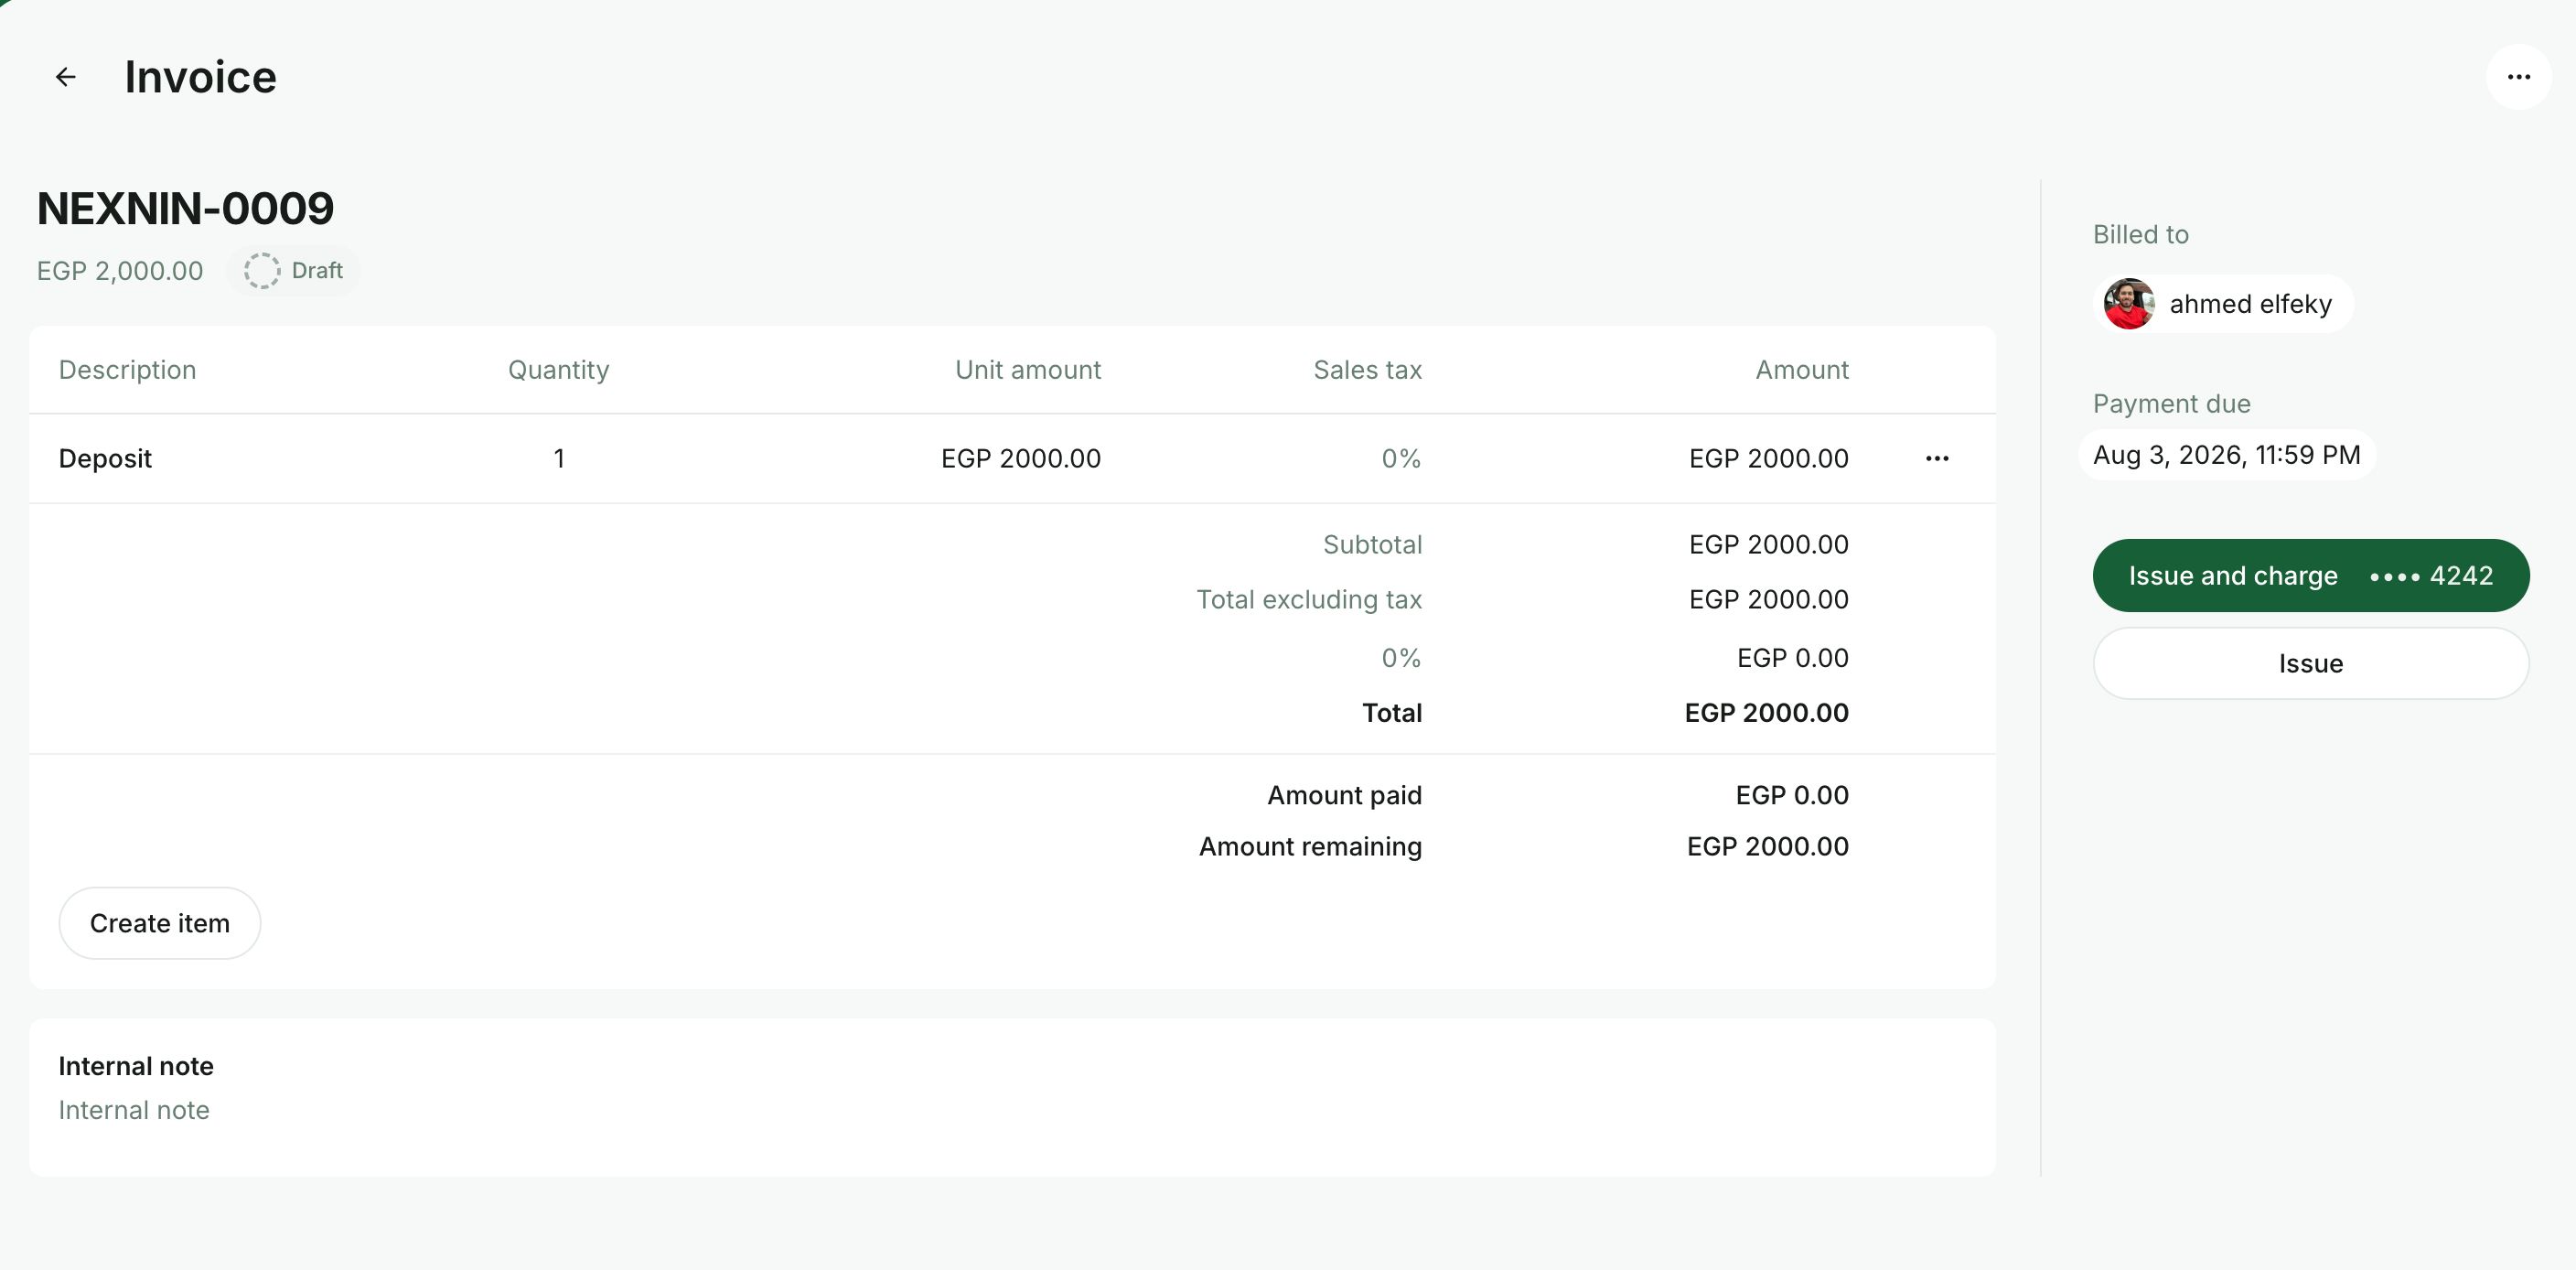
7. Click **Issue**. If the customer has any [saved payment methods](/docs/admin/billing/payments/payment-methods), the **Issue and charge** option will also appear, allowing you to charge the invoice immediately.
5. Optionally, add an internal note for your team's payment records and [set a custom payment due date](/docs/admin/billing/invoices/invoice-due-date#customize-the-payment-due-value-for-the-invoice). Then click **Create**.
6. Click **View invoice** in the confirmation message.
7. Click **Issue**. If the customer has any [saved payment methods](/docs/admin/billing/payments/payment-methods), the **Issue and charge** option will also appear, allowing you to charge the invoice immediately.
 If [Require billing details](/docs/admin/customer-management/billing-details#configure-billing-details-collection) is enabled, the customer's billing details must be [added to their profile](/docs/admin/customer-management/billing-details#how-administrators-add-billing-details-for-customers) before the invoice can be issued.
Manually created invoices use today's issue date and the next available invoice sequence number.
## FAQ
This happens for one of two reasons:
1. **Require billing details** is turned on for **Company** or **User** customers in your location. Their **Legal business name**, **Address**, and **Tax ID** must be filled in before you can issue the invoice. You have a few options:
* Fill out the customer’s billing details yourself: in the customer’s profile, locate the **Billing details** section > **Edit** > fill in **Legal business name**, **Address**, and **Tax ID**. Issuing the invoice will then become possible.
* Ask the customer to add their own billing details: they can do this on the **Membership > Billing** page. Once saved, issuing the invoice will become possible.
* If you don’t actually need this requirement, disable **Require billing details** for **Users** and/or **Companies**: tap the \*\*settings \*\*> **Location settings > Customers** > toggle it off for the relevant type. Then you’ll be able to issue the invoice without the customer’s billing details.
2. [**eInvoicing**](/docs/admin/billing/invoices/einvoicing/veri-factu-in-spain) is connected for your location. Every invoice must be submitted as an eInvoice, which legally requires the customer’s billing details, regardless of the **Require billing details** setting above. Your options depend on the customer type:
* For a **Company** invoice, fill out the company’s billing details (**Customers > company > Billing details** section > **Edit**), or ask the company manager to add them (**Membership > their company’s section > Billing**).
* For a **User** invoice, fill out the user’s billing details (**Customers > user > Billing details** section > **Edit**), or ask the user to add them (**Membership > Personal > Billing**).
* For a **User** invoice, if you don’t need it synced as an eInvoice and don’t need the invoice to include the customer’s billing details, disable **Require billing details** for **Users**, and make sure the user’s **Legal business name** and **Tax ID** fields are both left empty (clear them if they were previously filled in). With both empty, RNTOR treats the customer as a simplified consumer, skips the eInvoicing sync for that invoice entirely, and lets you issue it without billing details.
This last option isn't available for company invoices — when eInvoicing is enabled, billing details are always required to issue a company invoice.
If [Require billing details](/docs/admin/customer-management/billing-details#configure-billing-details-collection) is enabled, the customer's billing details must be [added to their profile](/docs/admin/customer-management/billing-details#how-administrators-add-billing-details-for-customers) before the invoice can be issued.
Manually created invoices use today's issue date and the next available invoice sequence number.
## FAQ
This happens for one of two reasons:
1. **Require billing details** is turned on for **Company** or **User** customers in your location. Their **Legal business name**, **Address**, and **Tax ID** must be filled in before you can issue the invoice. You have a few options:
* Fill out the customer’s billing details yourself: in the customer’s profile, locate the **Billing details** section > **Edit** > fill in **Legal business name**, **Address**, and **Tax ID**. Issuing the invoice will then become possible.
* Ask the customer to add their own billing details: they can do this on the **Membership > Billing** page. Once saved, issuing the invoice will become possible.
* If you don’t actually need this requirement, disable **Require billing details** for **Users** and/or **Companies**: tap the \*\*settings \*\*> **Location settings > Customers** > toggle it off for the relevant type. Then you’ll be able to issue the invoice without the customer’s billing details.
2. [**eInvoicing**](/docs/admin/billing/invoices/einvoicing/veri-factu-in-spain) is connected for your location. Every invoice must be submitted as an eInvoice, which legally requires the customer’s billing details, regardless of the **Require billing details** setting above. Your options depend on the customer type:
* For a **Company** invoice, fill out the company’s billing details (**Customers > company > Billing details** section > **Edit**), or ask the company manager to add them (**Membership > their company’s section > Billing**).
* For a **User** invoice, fill out the user’s billing details (**Customers > user > Billing details** section > **Edit**), or ask the user to add them (**Membership > Personal > Billing**).
* For a **User** invoice, if you don’t need it synced as an eInvoice and don’t need the invoice to include the customer’s billing details, disable **Require billing details** for **Users**, and make sure the user’s **Legal business name** and **Tax ID** fields are both left empty (clear them if they were previously filled in). With both empty, RNTOR treats the customer as a simplified consumer, skips the eInvoicing sync for that invoice entirely, and lets you issue it without billing details.
This last option isn't available for company invoices — when eInvoicing is enabled, billing details are always required to issue a company invoice.