> ## Documentation Index
> Fetch the complete documentation index at: https://docs.rntor.com/docs/llms.txt
> Use this file to discover all available pages before exploring further.
# Templates
Create and upload your contract templates with dynamic placeholders to automatically populate customer details for new agreements
Upload your contract templates to quickly [create and issue contracts](/docs/admin/billing/contracts/set-up-contracts) for new customers.
## Create a contract template
You have two options for creating templates:
* Use our [sample template](https://docs.google.com/document/d/13uStLgiDO9QdG-agaCvmiM_0tMicyl-B/edit#heading=h.osvguxs4l39i) and customize it.
* Use your own template(s).
Contract templates must be in a Microsoft Word format.
### Create your own template with placeholders
Your contract template can include placeholders (variables) that the system will automatically fill in with customer-specific information when you create a contract. You don’t need to include every placeholder—only add the ones required for your contract and legal needs.
#### Supported placeholders
##### Contract dates
* `{contract.issueDate}` — date the contract is issued
* `{contract.startDate}` — start date of the contract
* `{contract.endDate}` — end date of the contract
##### Customer details
* `{customer.legalName}` — legal business name of the user or company
* `{customer.businessAddress}` — customer’s billing address
* `{customer.taxId}` — customer’s tax ID
##### Customer signatory
* `{customer.signatory.fullName}` — full name of the person signing for the customer
* `{customer.signatory.email}` — signatory’s email address
* `{customer.signatory.phoneNumber}` — signatory’s phone number
* `{customer.signatory.signature}` — place for digital signature
* `{customer.signatory.signature_date}` — customer’s signature date
If more than one person needs to sign on behalf of the customer, you can add additional signatory placeholders by numbering them sequentially after the original placeholders:
* **Second signatory:** `{customer.signatory2.fullName}`, `{customer.signatory2.email}`, `{customer.signatory2.phoneNumber}`, `{customer.signatory2.signature}`, `{customer.signatory2.signature_date}`
* **Third signatory:** `{customer.signatory3.fullName}`, `{customer.signatory3.email}`, `{customer.signatory3.phoneNumber}`, `{customer.signatory3.signature}`, `{customer.signatory3.signature_date}`
##### Location details
* `{location.legalName}` — location legal business name
* `{location.businessAddress}` — location billing address
* `{location.taxId}` — location tax ID
##### Location signatory
* `{location.signatory.fullName}` — full name of the administrator or owner signing for the location
* `{location.signatory.email}` — signatory’s email address
* `{location.signatory.phoneNumber}` — signatory’s phone number
* `{location.signatory.signature}` — place for digital signature
* `{location.signatory.signature_date}` — signature date
If more than one person needs to sign on behalf of the location, you can add additional signatory placeholders by numbering them sequentially after the original placeholders:
* **Second signatory:** `{location.signatory2.fullName}`, `{location.signatory2.email}`, `{location.signatory2.phoneNumber}`, `{location.signatory2.signature}`, `{location.signatory2.signature_date}`
If there are multiple signatories on both the customer and location sides, number them separately.
**Correct customer sequence:**
`{customer.signatory.fullName}`, `{customer.signatory2.fullName}`
**Correct location sequence:**
`{location.signatory.fullName}`, `{location.signatory2.fullName}`
**Incorrect example:**
Do not mix customer and location signatory sequences:
`{customer.signatory.fullName}`, `{customer.signatory2.fullName}`, `{location.signatory3.fullName}`
##### Contract items
To list items such as plans or products included in a customer’s contract, place all placeholders related to contract items between the opening and closing tags: `{#items}` and `{/items}`.
This tells the system where the list of items begins and ends.
* `{#items}` — opening tag
* `{title}` — title of the plan or resource tier
* `{price}` — unit price for the plan or resource
* `{quantity}` — quantity of the plan or resource
* `{tax}` — tax rate for the plan or resource
* `{total}` — total undiscounted price for this specific item (Price × Quantity)
* `{coupon}` — discount coupon percentage or amount, if applied
* `{/items}` — closing tag
* `{items.total}` — total undiscounted price for all items in the contract combined. Place it outside the item tags.
##### Example 1
 ##### Example 2
`{#items}{title} - {price} - {quantity}{/items}`
## Upload a template
1. Go to the **Location settings > Billing** page and open the **Contracts** tab.
2. Enable the **Contracts** switch.
3. In the **Templates** section, click `Create template`.
##### Example 2
`{#items}{title} - {price} - {quantity}{/items}`
## Upload a template
1. Go to the **Location settings > Billing** page and open the **Contracts** tab.
2. Enable the **Contracts** switch.
3. In the **Templates** section, click `Create template`.
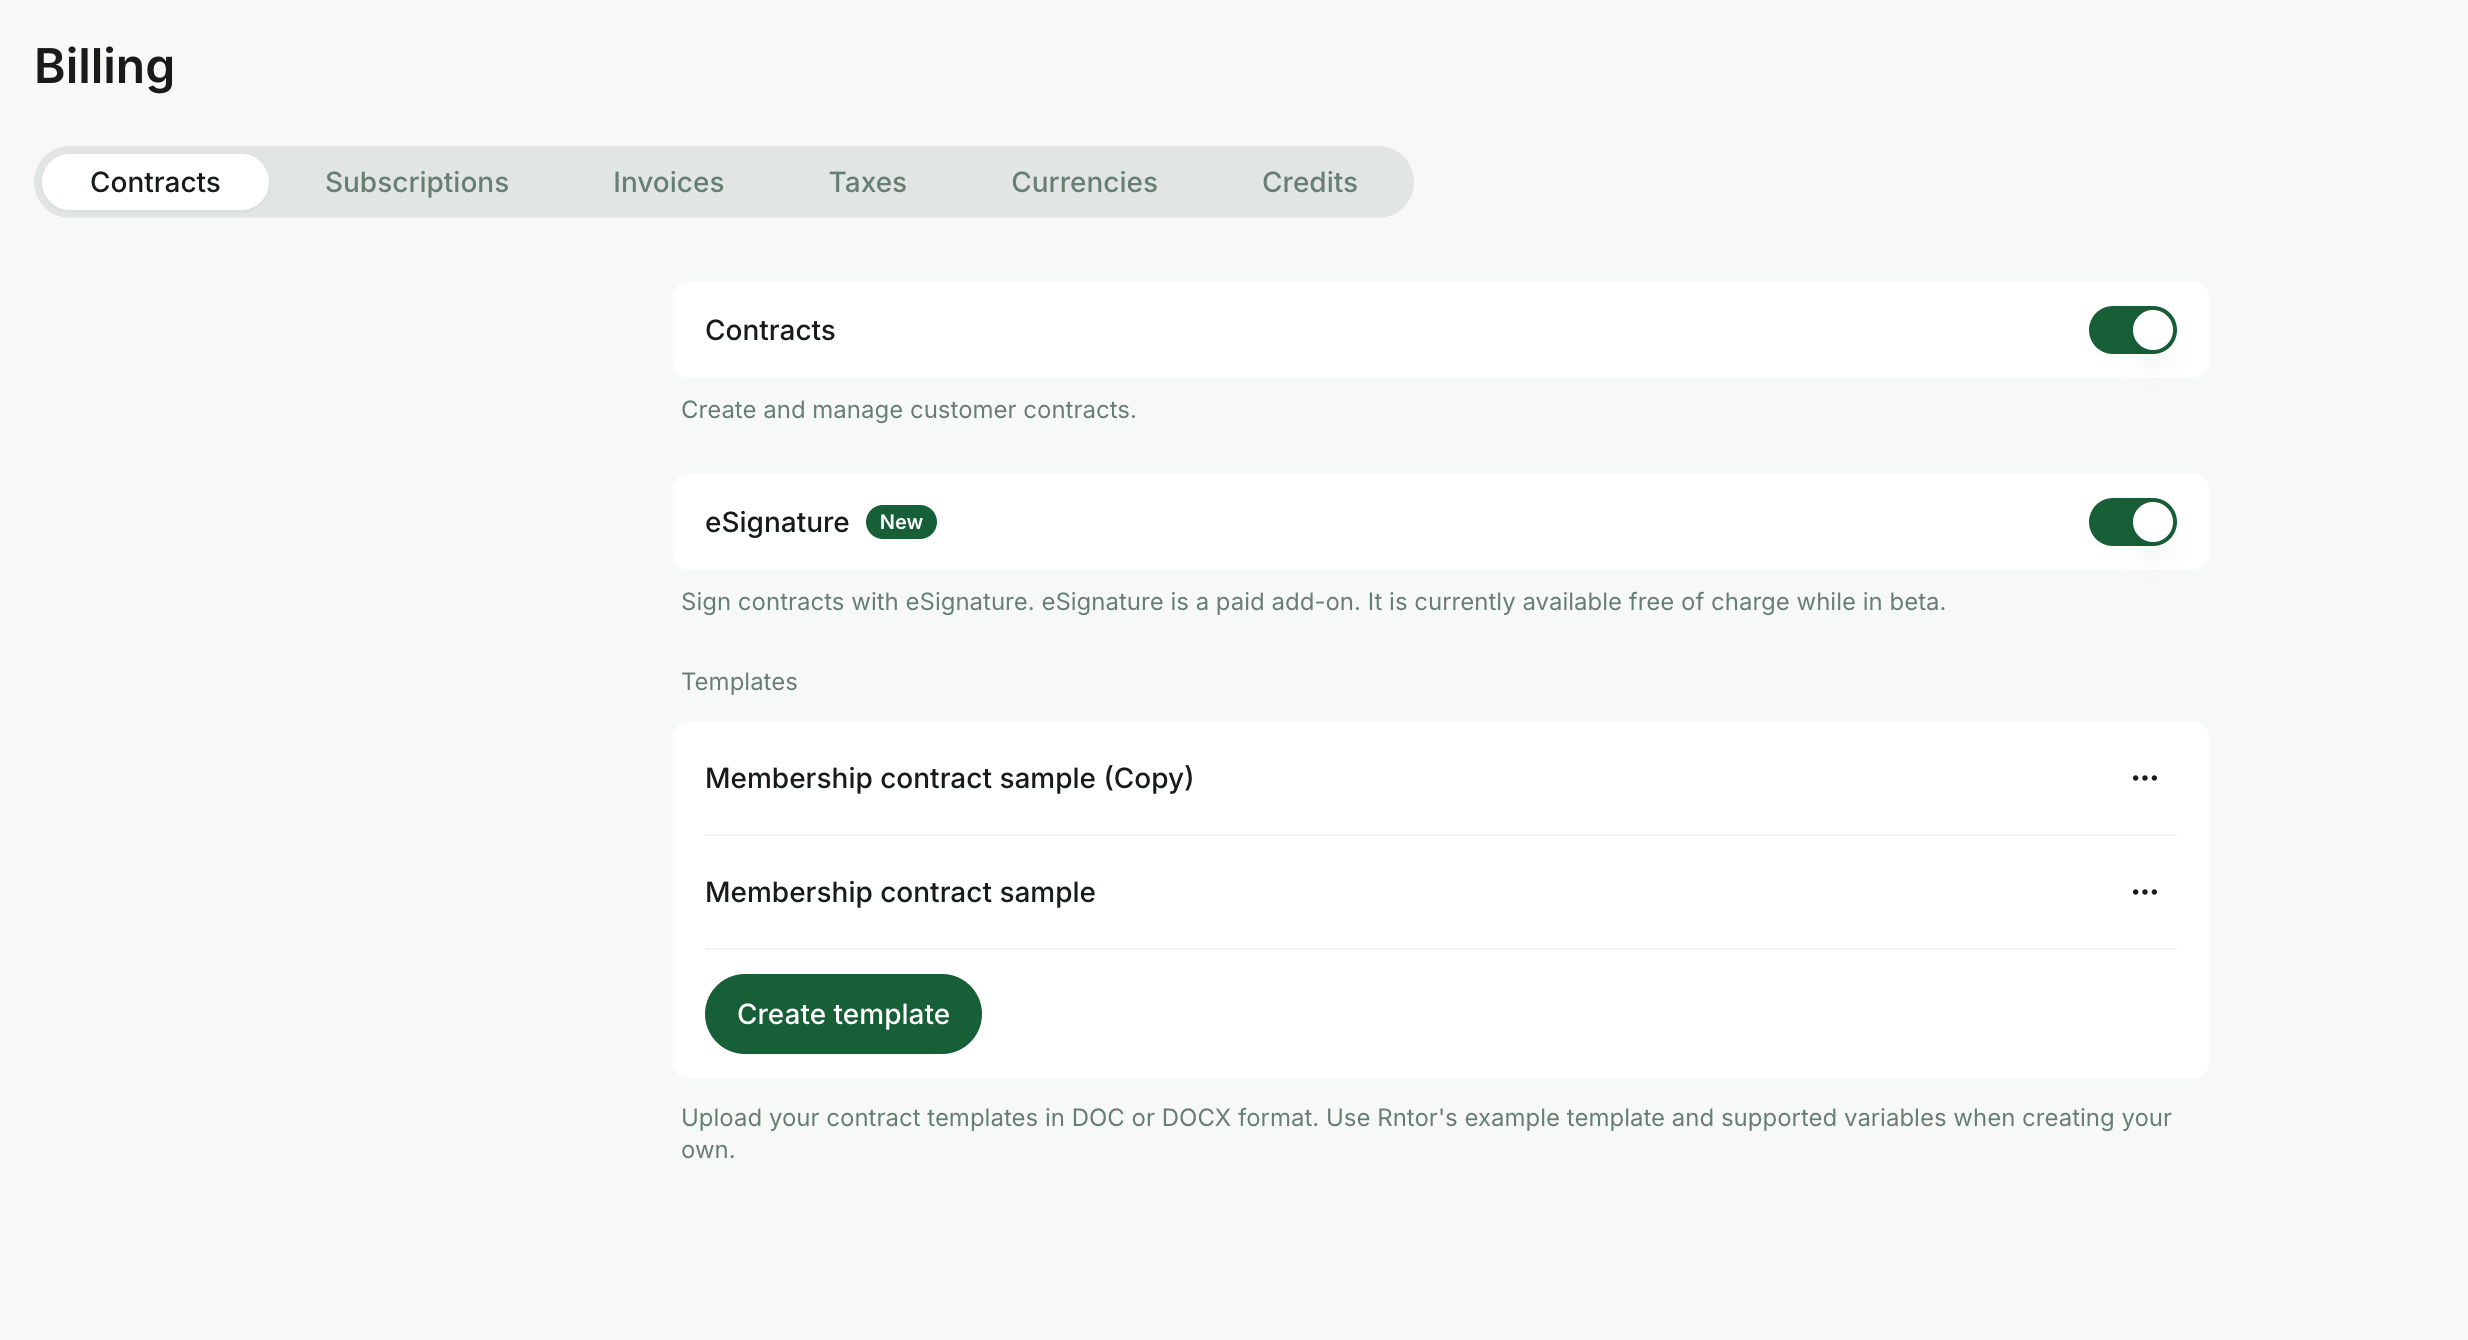 4. Press `Upload file`, upload the template, and add its title.
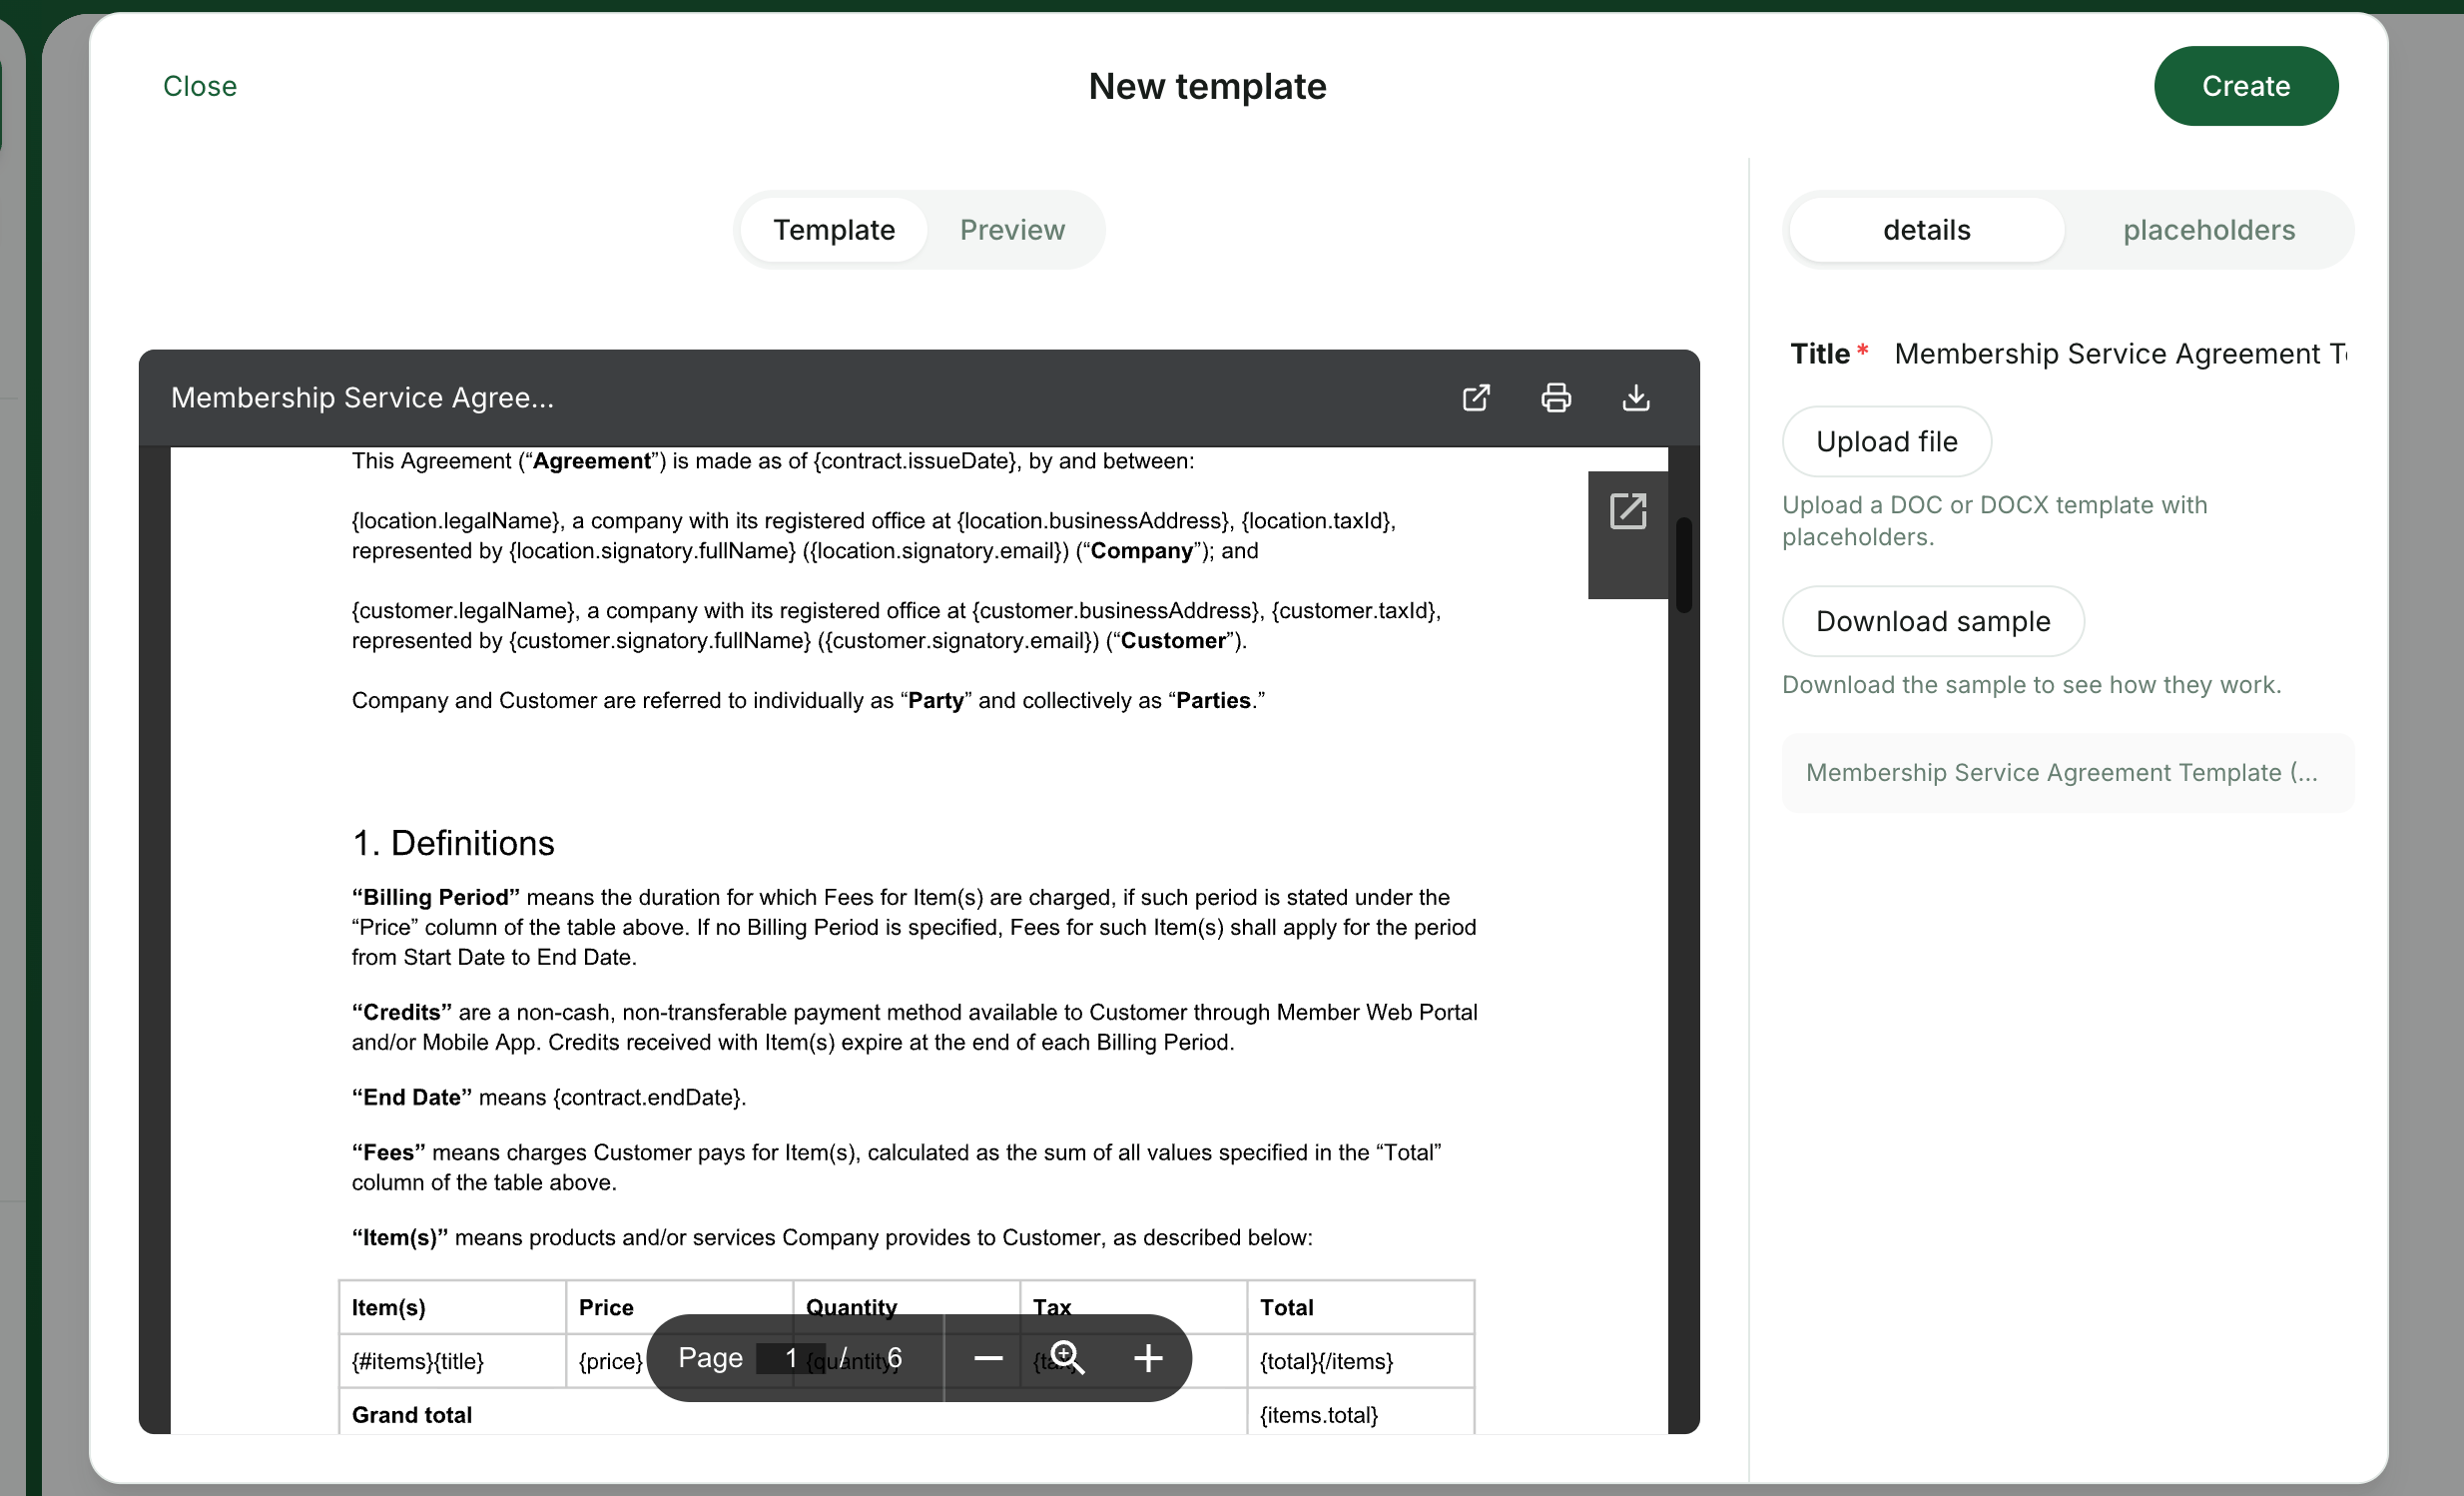 5. Switch to the **Preview** tab to see exactly how the final contract will look.
The preview uses random placeholder values to demonstrate formatting, but actual customer and location information will replace these placeholders when creating a contract for a specific customer.
5. Switch to the **Preview** tab to see exactly how the final contract will look.
The preview uses random placeholder values to demonstrate formatting, but actual customer and location information will replace these placeholders when creating a contract for a specific customer.
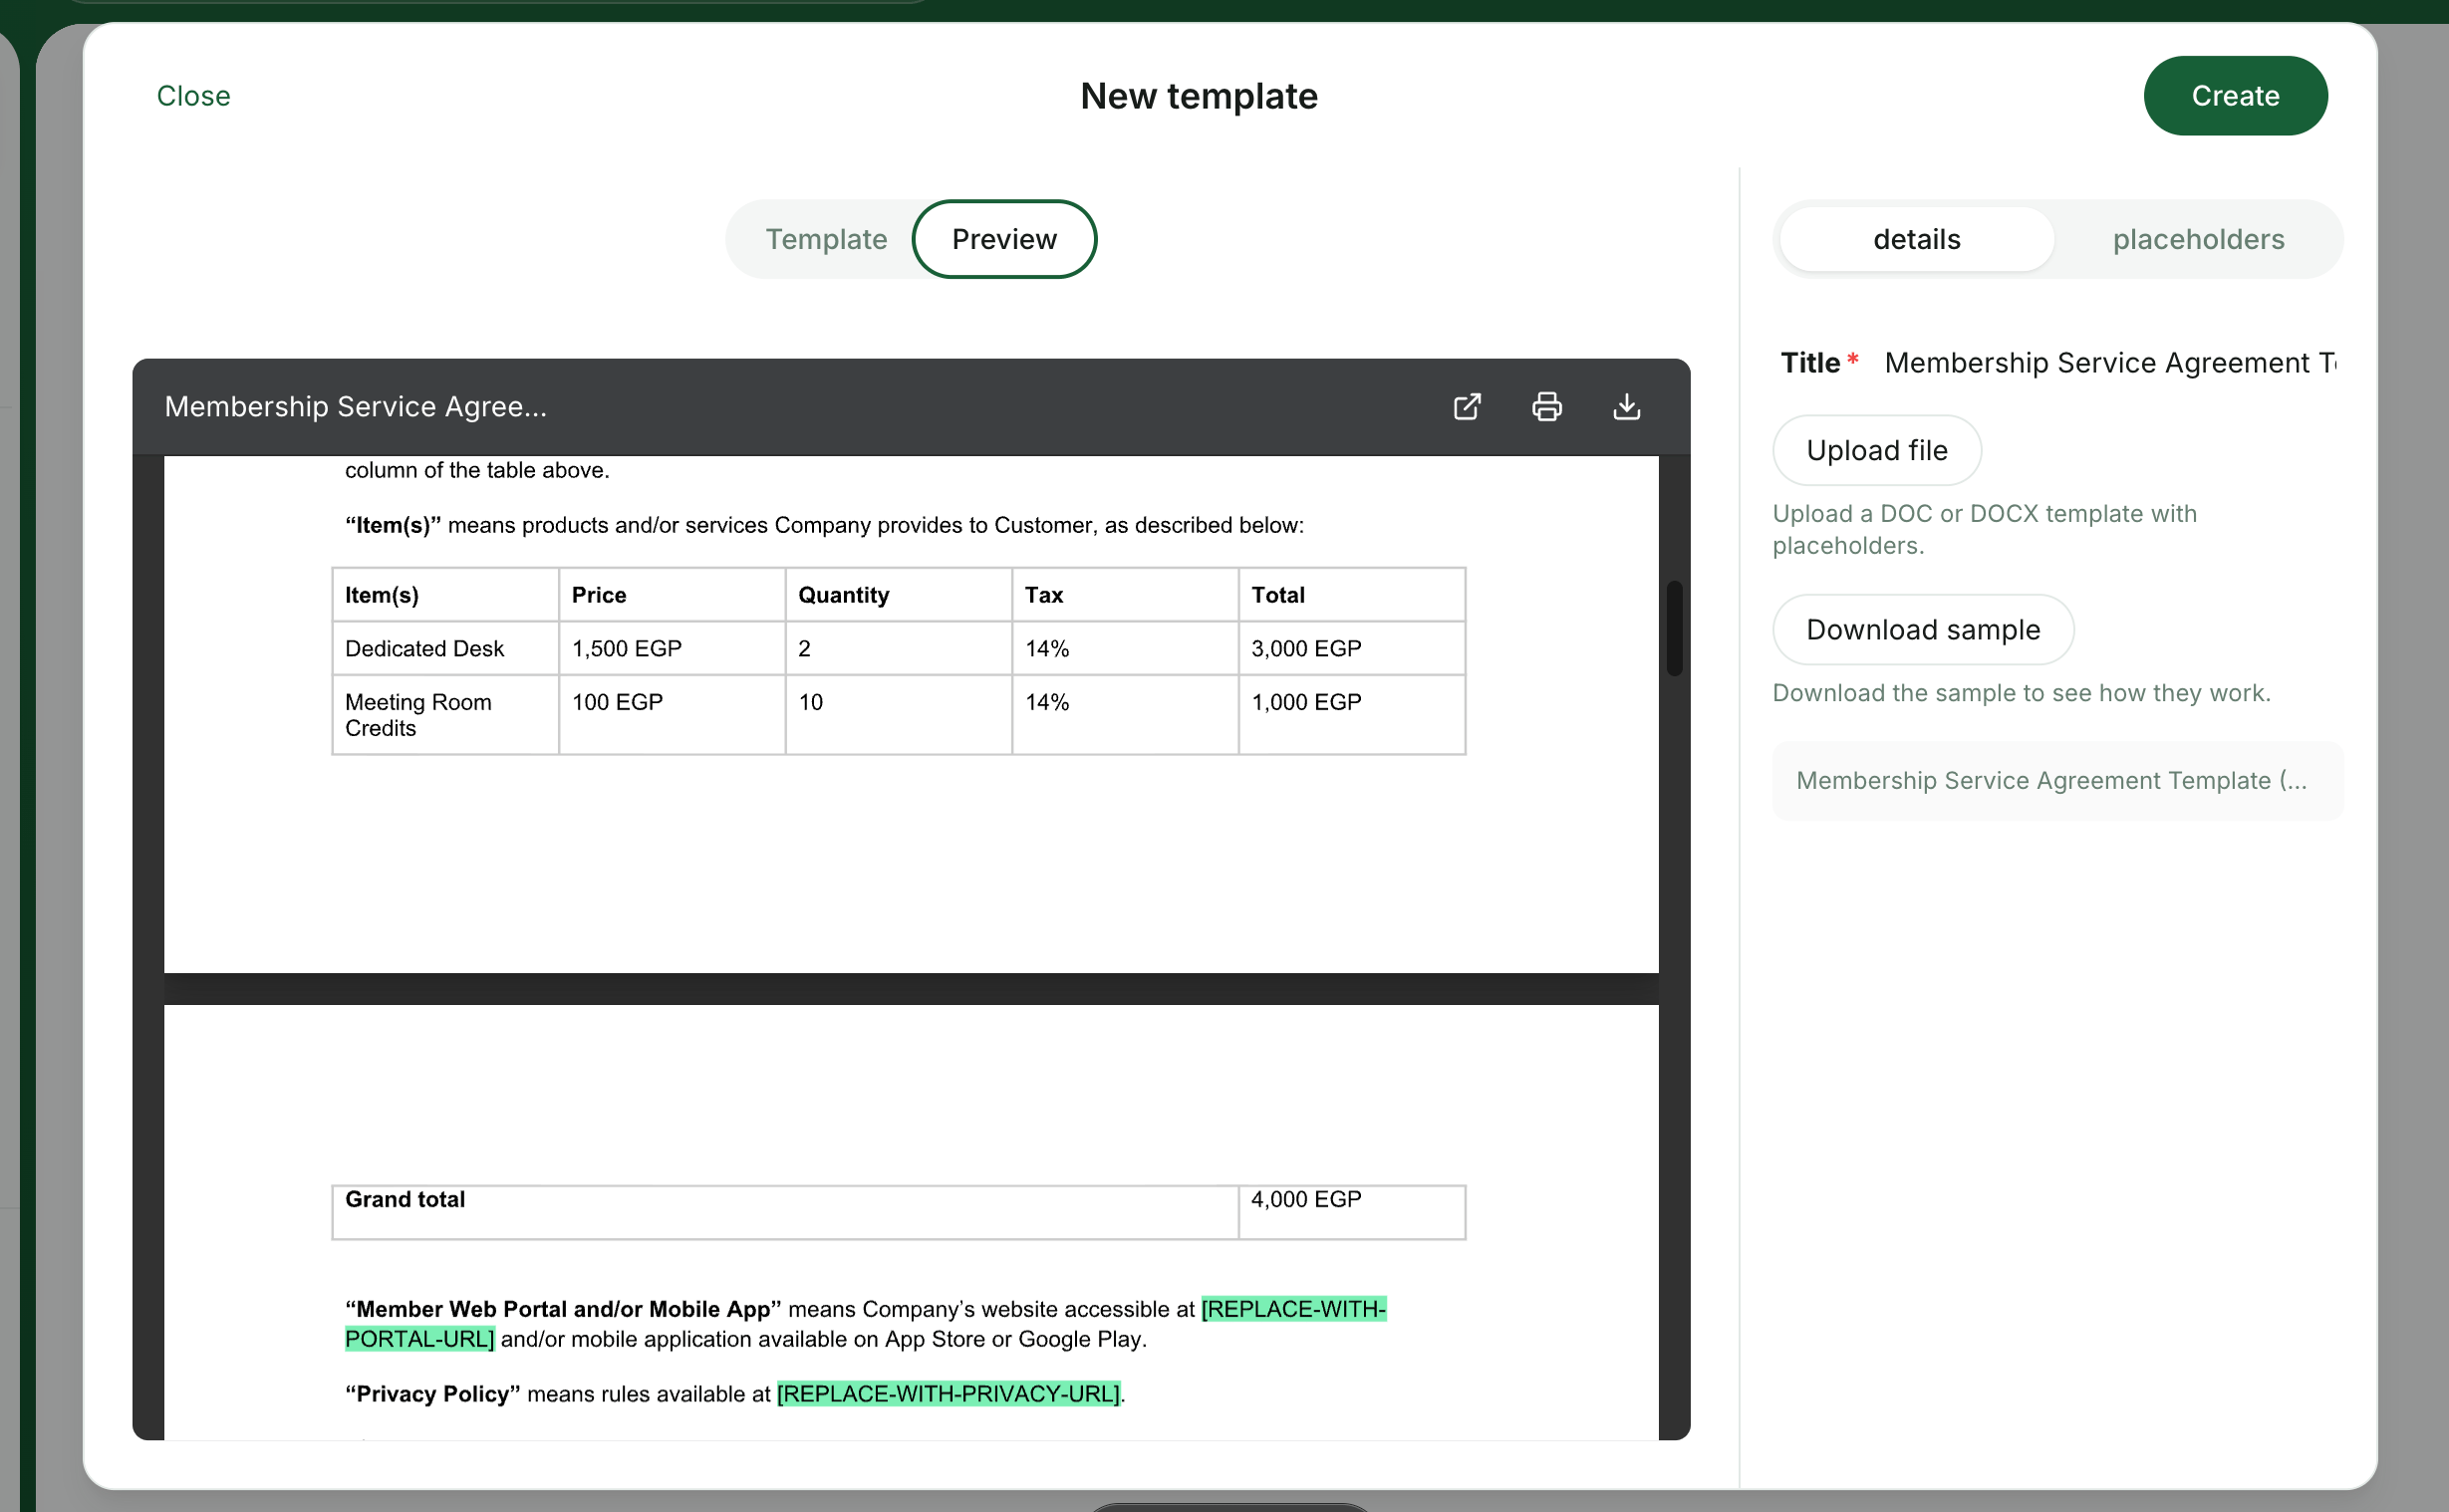 6. Press `Create`.
Once created, you can select the necessary template when [creating contracts](https://www.spacebring.com/docs/billing/contracts#create-a-contract) for your customers.
## Manage a template
1. Click the **(...)** menu button next to the necessary template.
2. Choose an action:
* `Edit` — change the template title or replace the template document with a new version.
* `Duplicate` — quickly create a similar template for minor adjustments.
* `Delete` — delete the template if it’s no longer needed.
6. Press `Create`.
Once created, you can select the necessary template when [creating contracts](https://www.spacebring.com/docs/billing/contracts#create-a-contract) for your customers.
## Manage a template
1. Click the **(...)** menu button next to the necessary template.
2. Choose an action:
* `Edit` — change the template title or replace the template document with a new version.
* `Duplicate` — quickly create a similar template for minor adjustments.
* `Delete` — delete the template if it’s no longer needed.
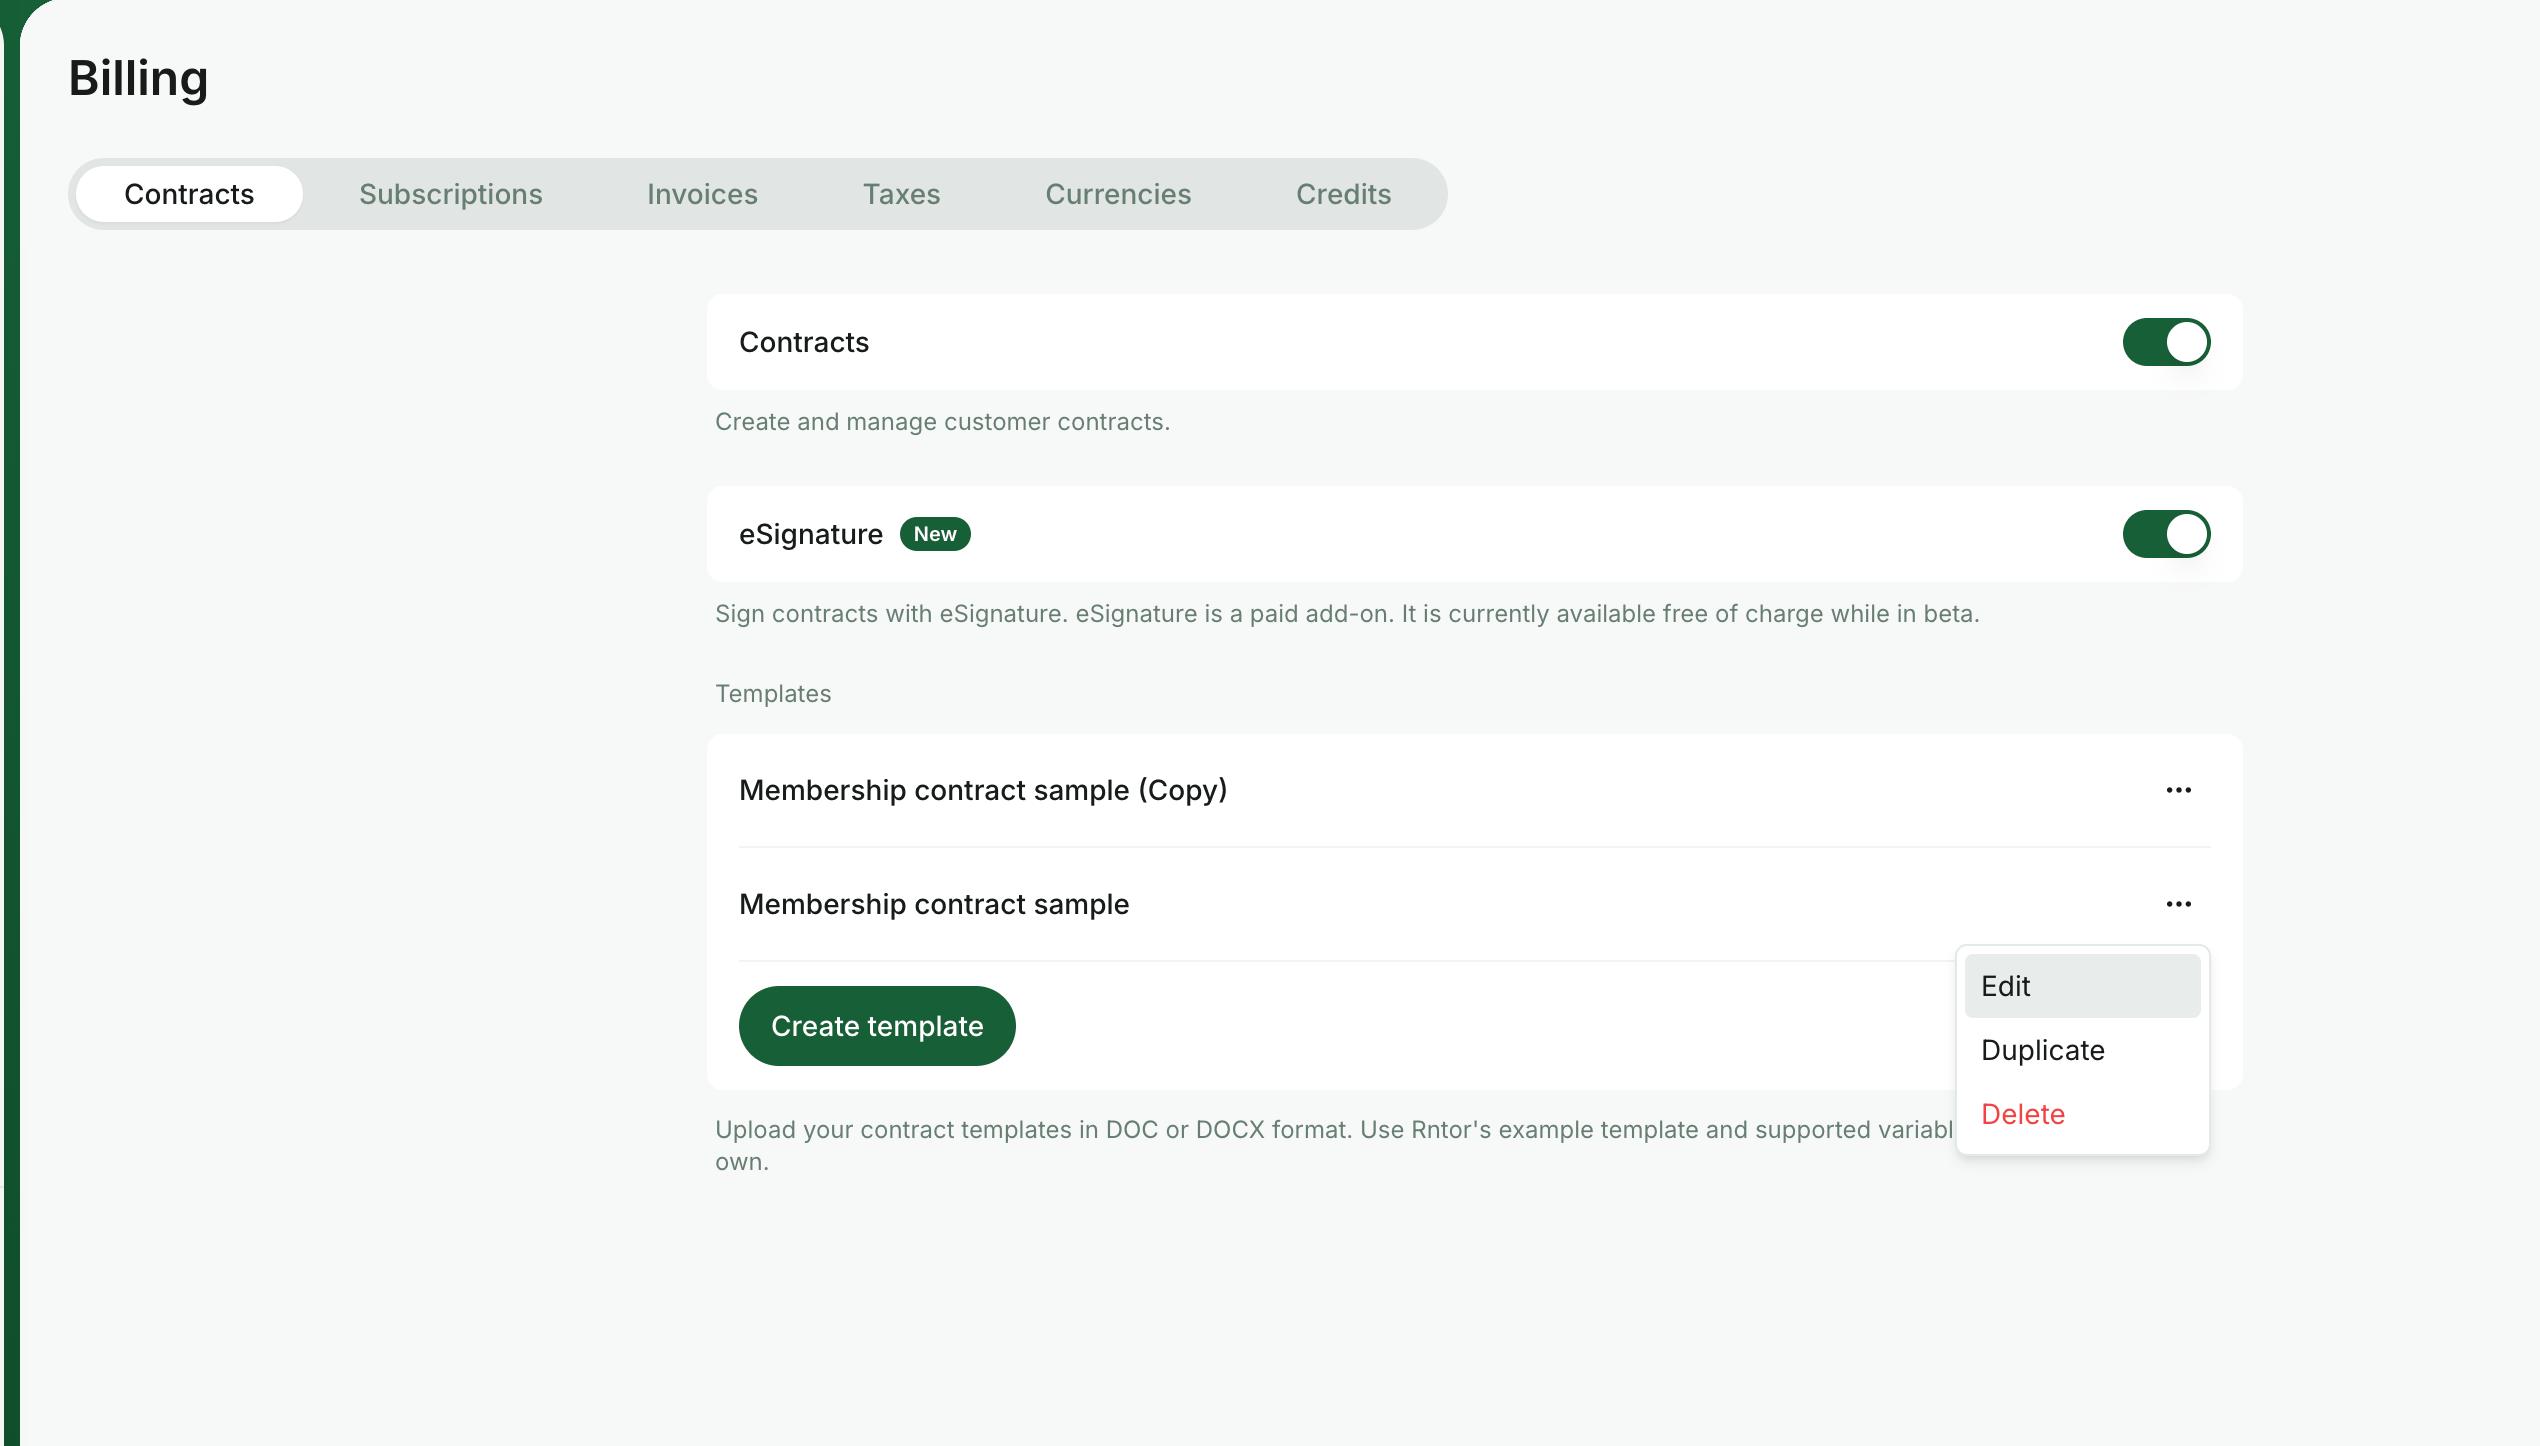 Deleting a template is irreversible.