> ## Documentation Index
> Fetch the complete documentation index at: https://docs.rntor.com/docs/llms.txt
> Use this file to discover all available pages before exploring further.
# Signatures
## Enable and issue contracts for eSignature, understand how customers receive and sign contracts electronically
The eSignature allows you to send contracts to customers and let them sign electronically — without any manual paperwork or back-and-forth.
Starting from **May 1, 2026**, eSignature moves to a usage-based paid model. Charges are applied automatically based on the total number of contracts issued for eSignature. [Pricing](https://www.rntor.com/en/pricing)
## Enable eSignature
1. Go to the **Location settings > Billing** page and open the **Contracts** tab.
2. Enable the **eSignature** switch.
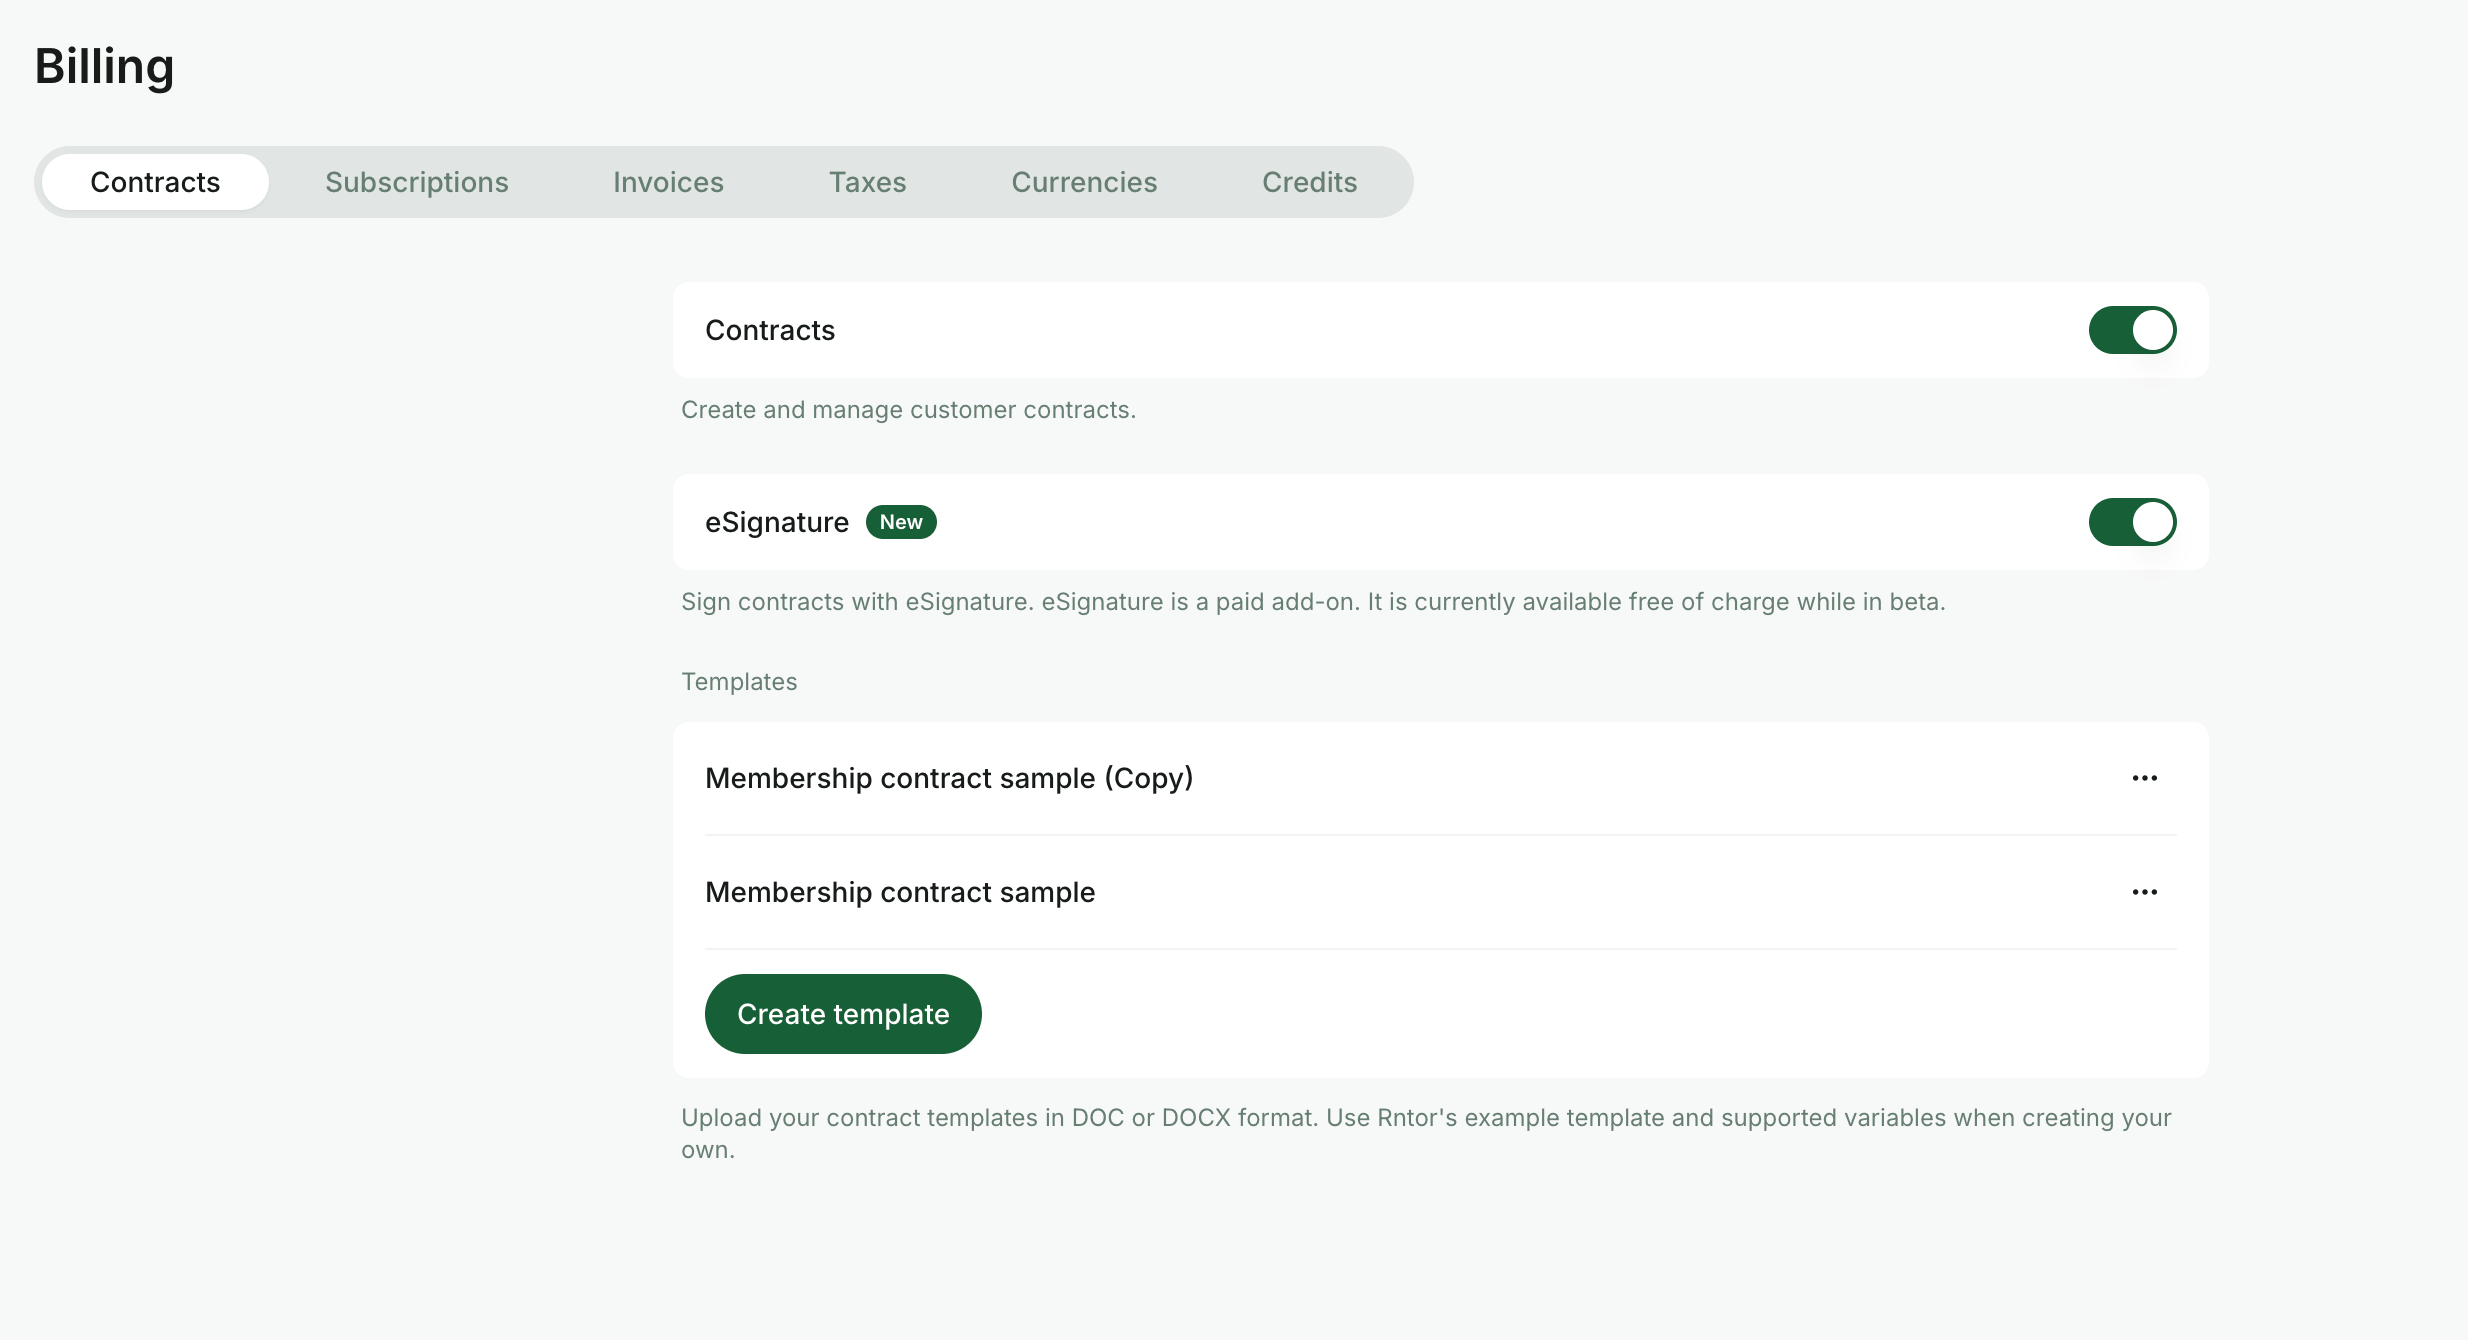 3. Make sure your contract template(s) contain the `{customer.signatory.signature}` [placeholder](/docs/admin/billing/contracts/templates), along with any other placeholders you need. This tells the system where the customer should sign.
## Issue contracts for eSignature
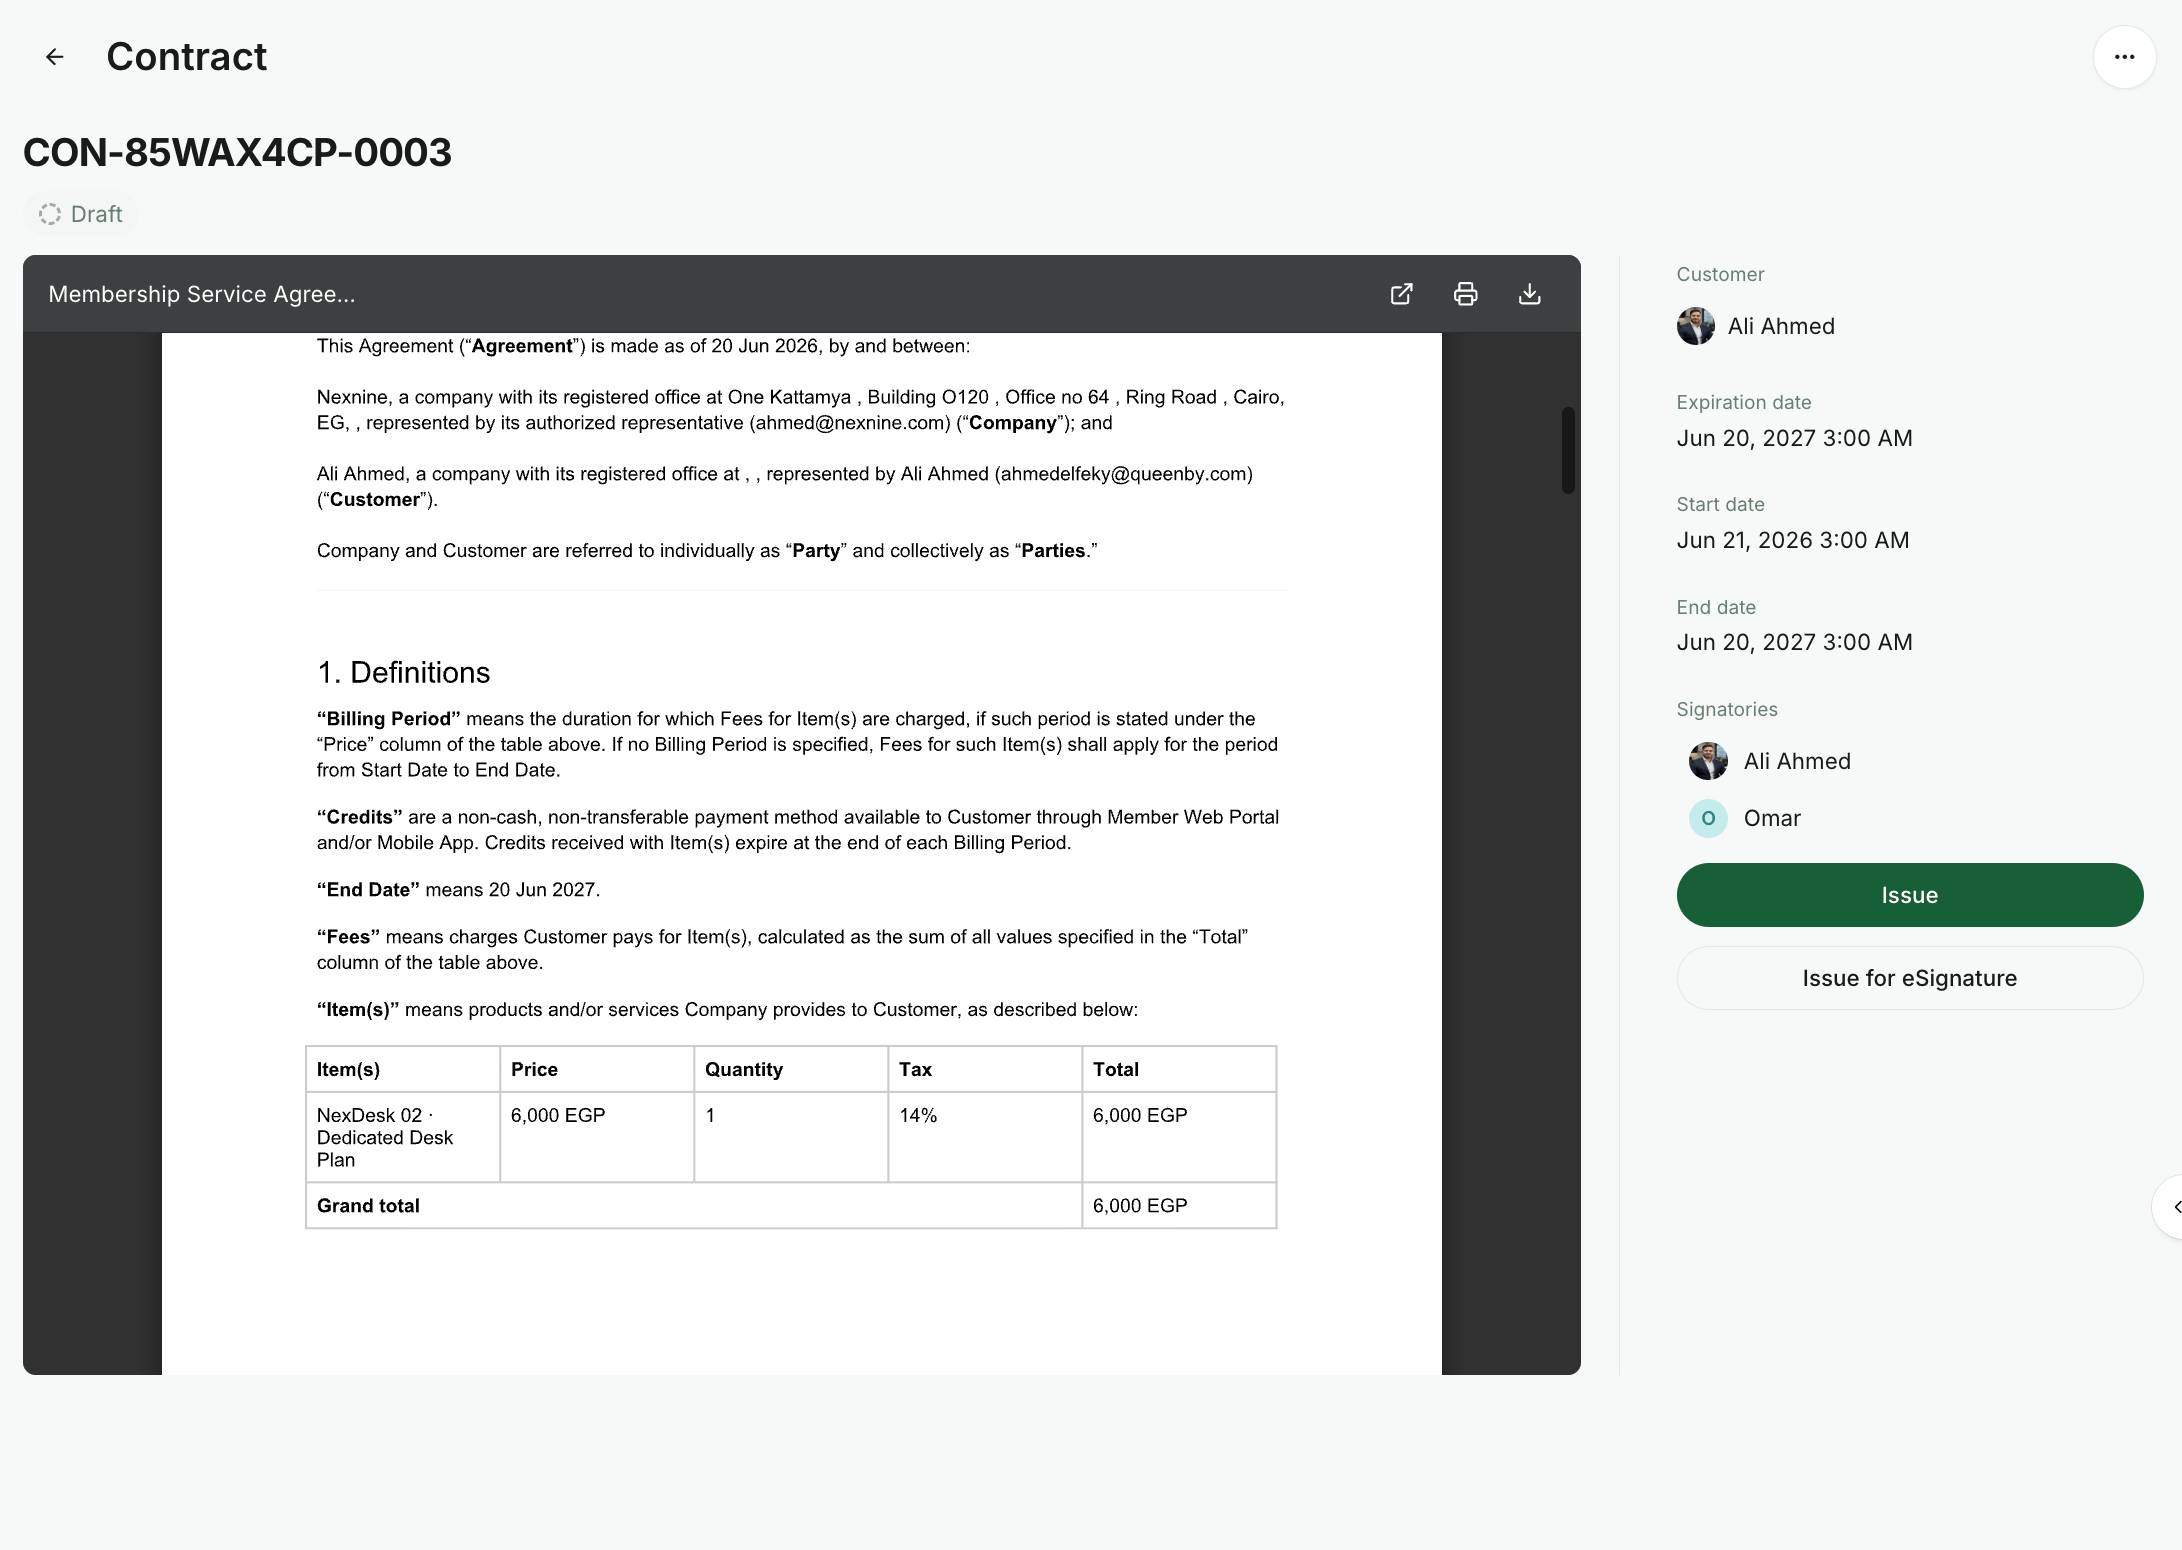
1. Go to **Billing > Contracts** to [create a contract](/docs/admin/billing/contracts/set-up-contracts#create-a-contract) for a certain customer.
2. Add signatories. You can add:
* Both customer and location signatories.
* Customer signatories only, if no signature is required from your side.
3. Drag and drop the signatories to define the signing order.
Signing is sequential — each person receives the contract for signature only after the previous signatory has completed their signature.
4. Once created, open the contract and click `Issue for eSignature`.
3. Make sure your contract template(s) contain the `{customer.signatory.signature}` [placeholder](/docs/admin/billing/contracts/templates), along with any other placeholders you need. This tells the system where the customer should sign.
## Issue contracts for eSignature
1. Go to **Billing > Contracts** to [create a contract](/docs/admin/billing/contracts/set-up-contracts#create-a-contract) for a certain customer.
2. Add signatories. You can add:
* Both customer and location signatories.
* Customer signatories only, if no signature is required from your side.
3. Drag and drop the signatories to define the signing order.
Signing is sequential — each person receives the contract for signature only after the previous signatory has completed their signature.
4. Once created, open the contract and click `Issue for eSignature`.
 ## How customers receive and sign contracts electronically
After issuing the contract:
1. The first signatory receives the contract by email and clicks `Open contract`.
2. They are taken to an online signing page where they can read the contract and click `Click to sign`.
## How customers receive and sign contracts electronically
After issuing the contract:
1. The first signatory receives the contract by email and clicks `Open contract`.
2. They are taken to an online signing page where they can read the contract and click `Click to sign`.
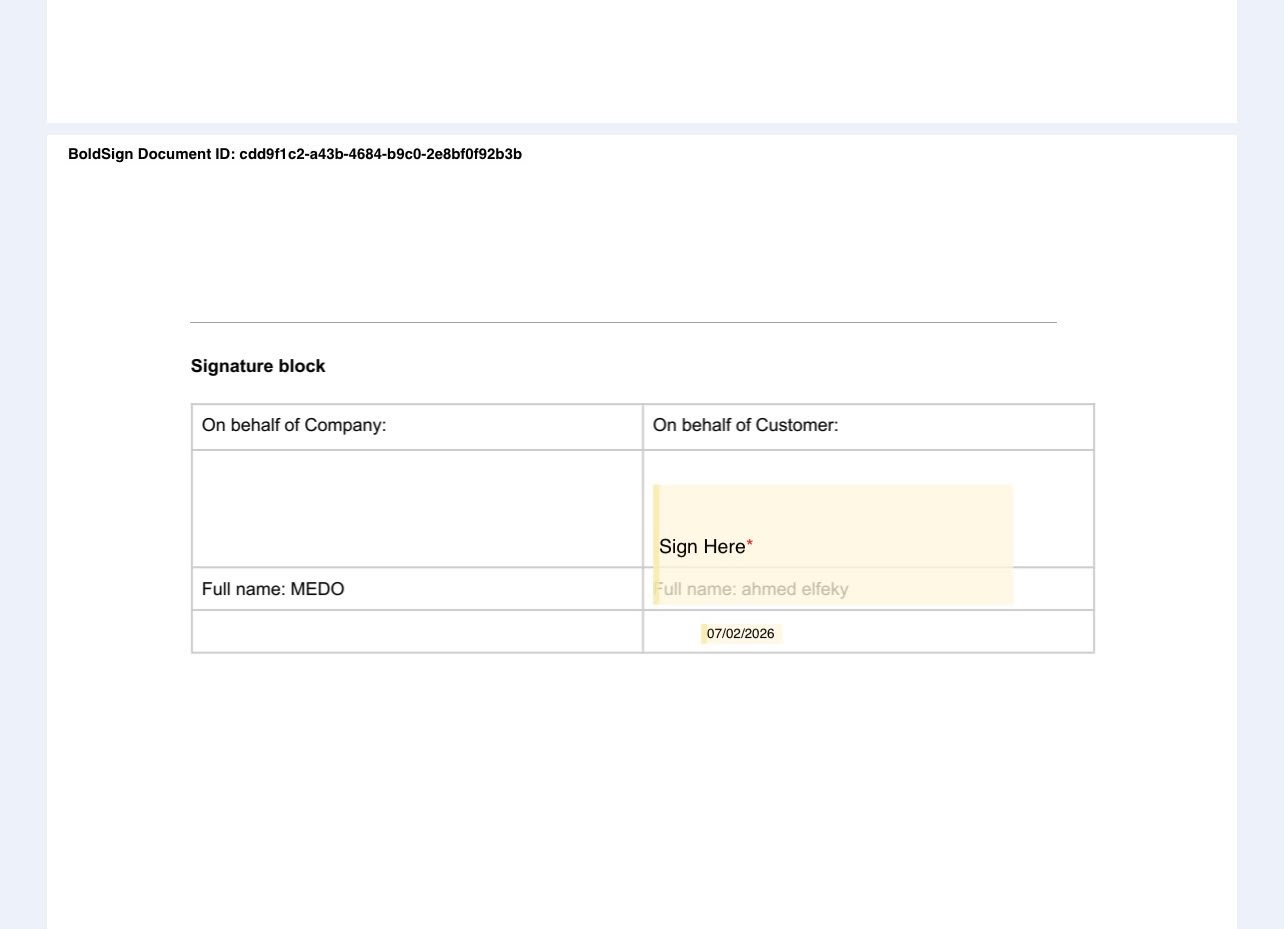 3. They can draw, type, or upload their signature.
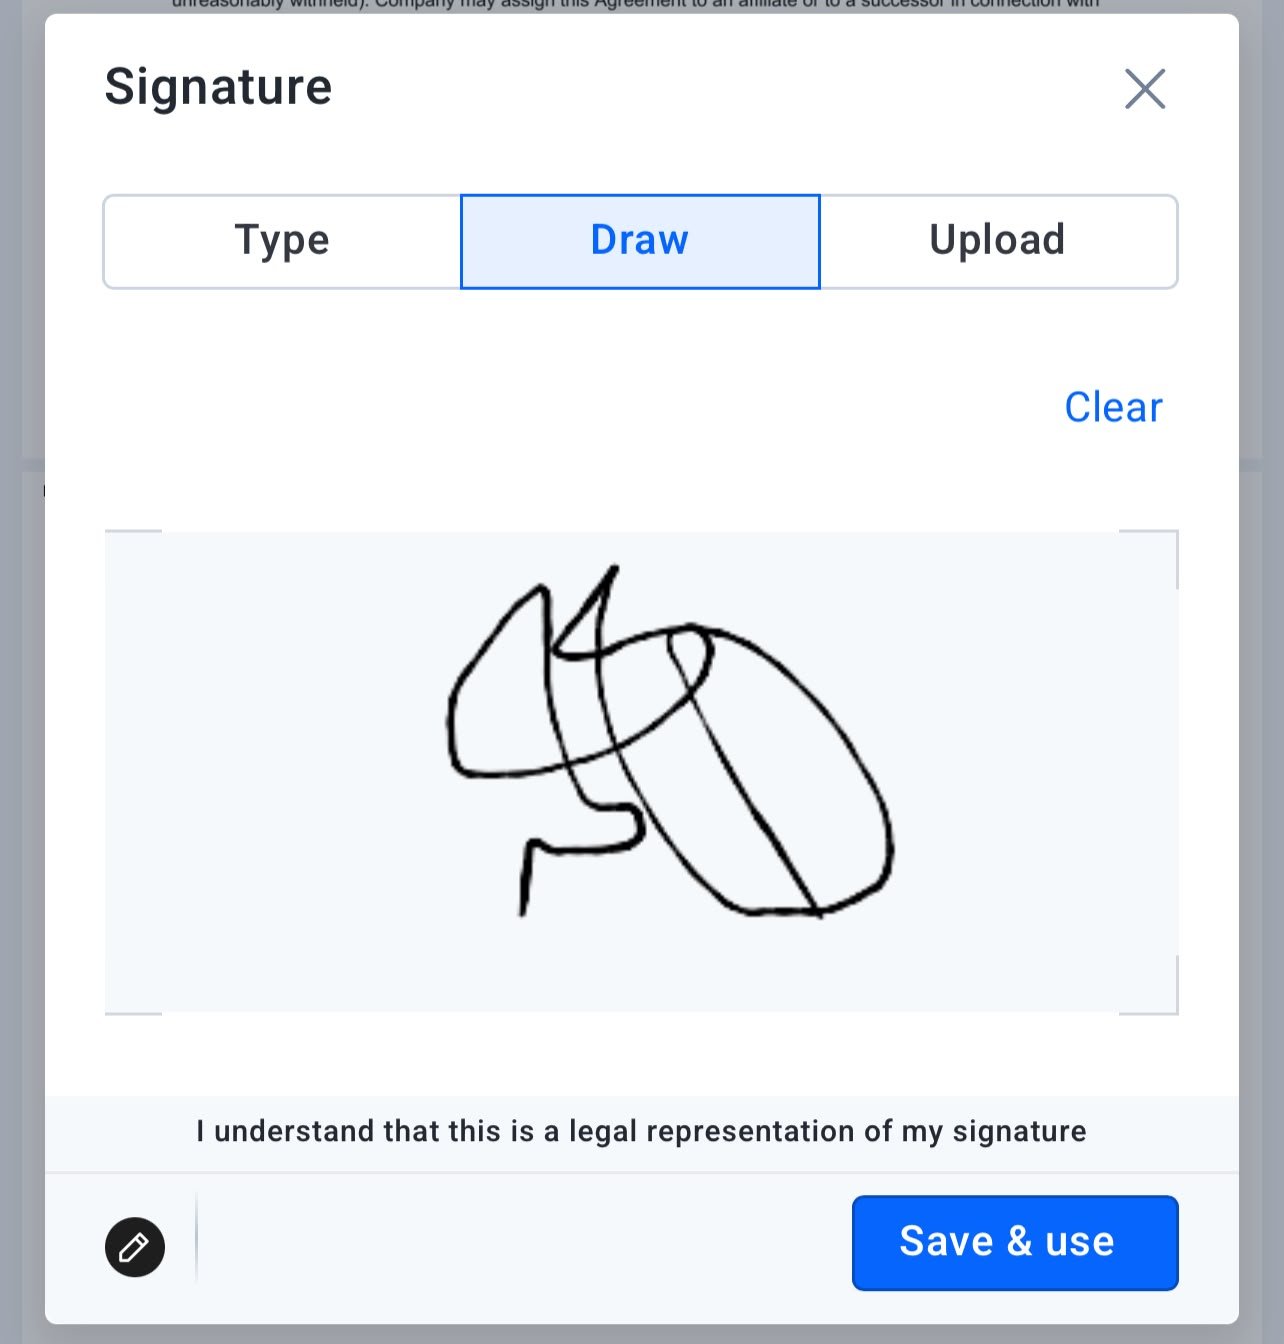 4. Proceed with confirming the signature.
5. If you added multiple signatories, the next signatory receives the same email after the previous signatory has signed. They complete the signature using the same steps.
After all required signatures are collected:
* The contract is automatically marked as **Signed** in Rntor.
* The finalized document is updated with all signatures shortly after completion.
Depending on your contract settings:
* If **Create subscription from contract** was enabled, the customer’s subscription is automatically created and activated.
* If **Issue invoice from contract** was enabled, the invoice is automatically generated and issued.
## **Manage external signatures**
if a customer needs to sign the contract manually (physically), you can manually record and upload the signed document into the system.
## Mark the contract as signed
Once the customer signs the contract manually, follow these steps:
1. Go to **Customers** > open the customer profile > **Contracts** page. Alternatively, go to **Billing > Contracts** and use the filters to find the necessary contract.
4. Proceed with confirming the signature.
5. If you added multiple signatories, the next signatory receives the same email after the previous signatory has signed. They complete the signature using the same steps.
After all required signatures are collected:
* The contract is automatically marked as **Signed** in Rntor.
* The finalized document is updated with all signatures shortly after completion.
Depending on your contract settings:
* If **Create subscription from contract** was enabled, the customer’s subscription is automatically created and activated.
* If **Issue invoice from contract** was enabled, the invoice is automatically generated and issued.
## **Manage external signatures**
if a customer needs to sign the contract manually (physically), you can manually record and upload the signed document into the system.
## Mark the contract as signed
Once the customer signs the contract manually, follow these steps:
1. Go to **Customers** > open the customer profile > **Contracts** page. Alternatively, go to **Billing > Contracts** and use the filters to find the necessary contract.
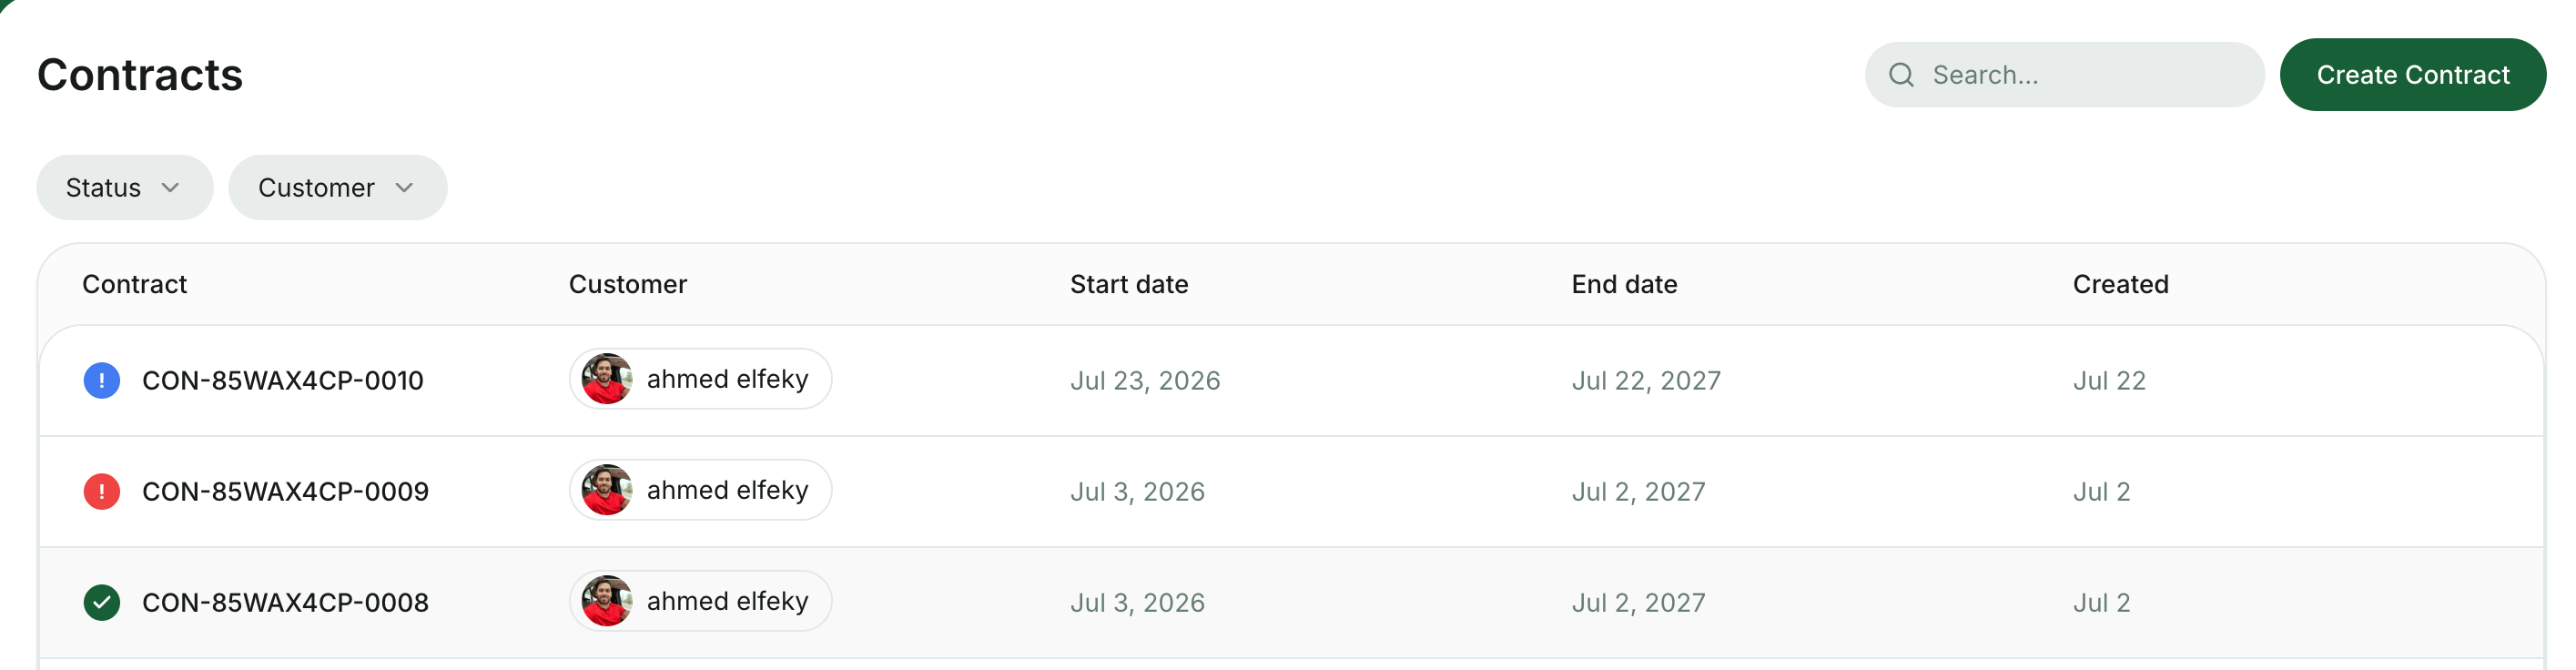 2. Open the necessary contract.
3. In the **Signatories** section, press the **(...)** menu next to the signatory’s name and select `Mark as signed`.
2. Open the necessary contract.
3. In the **Signatories** section, press the **(...)** menu next to the signatory’s name and select `Mark as signed`.
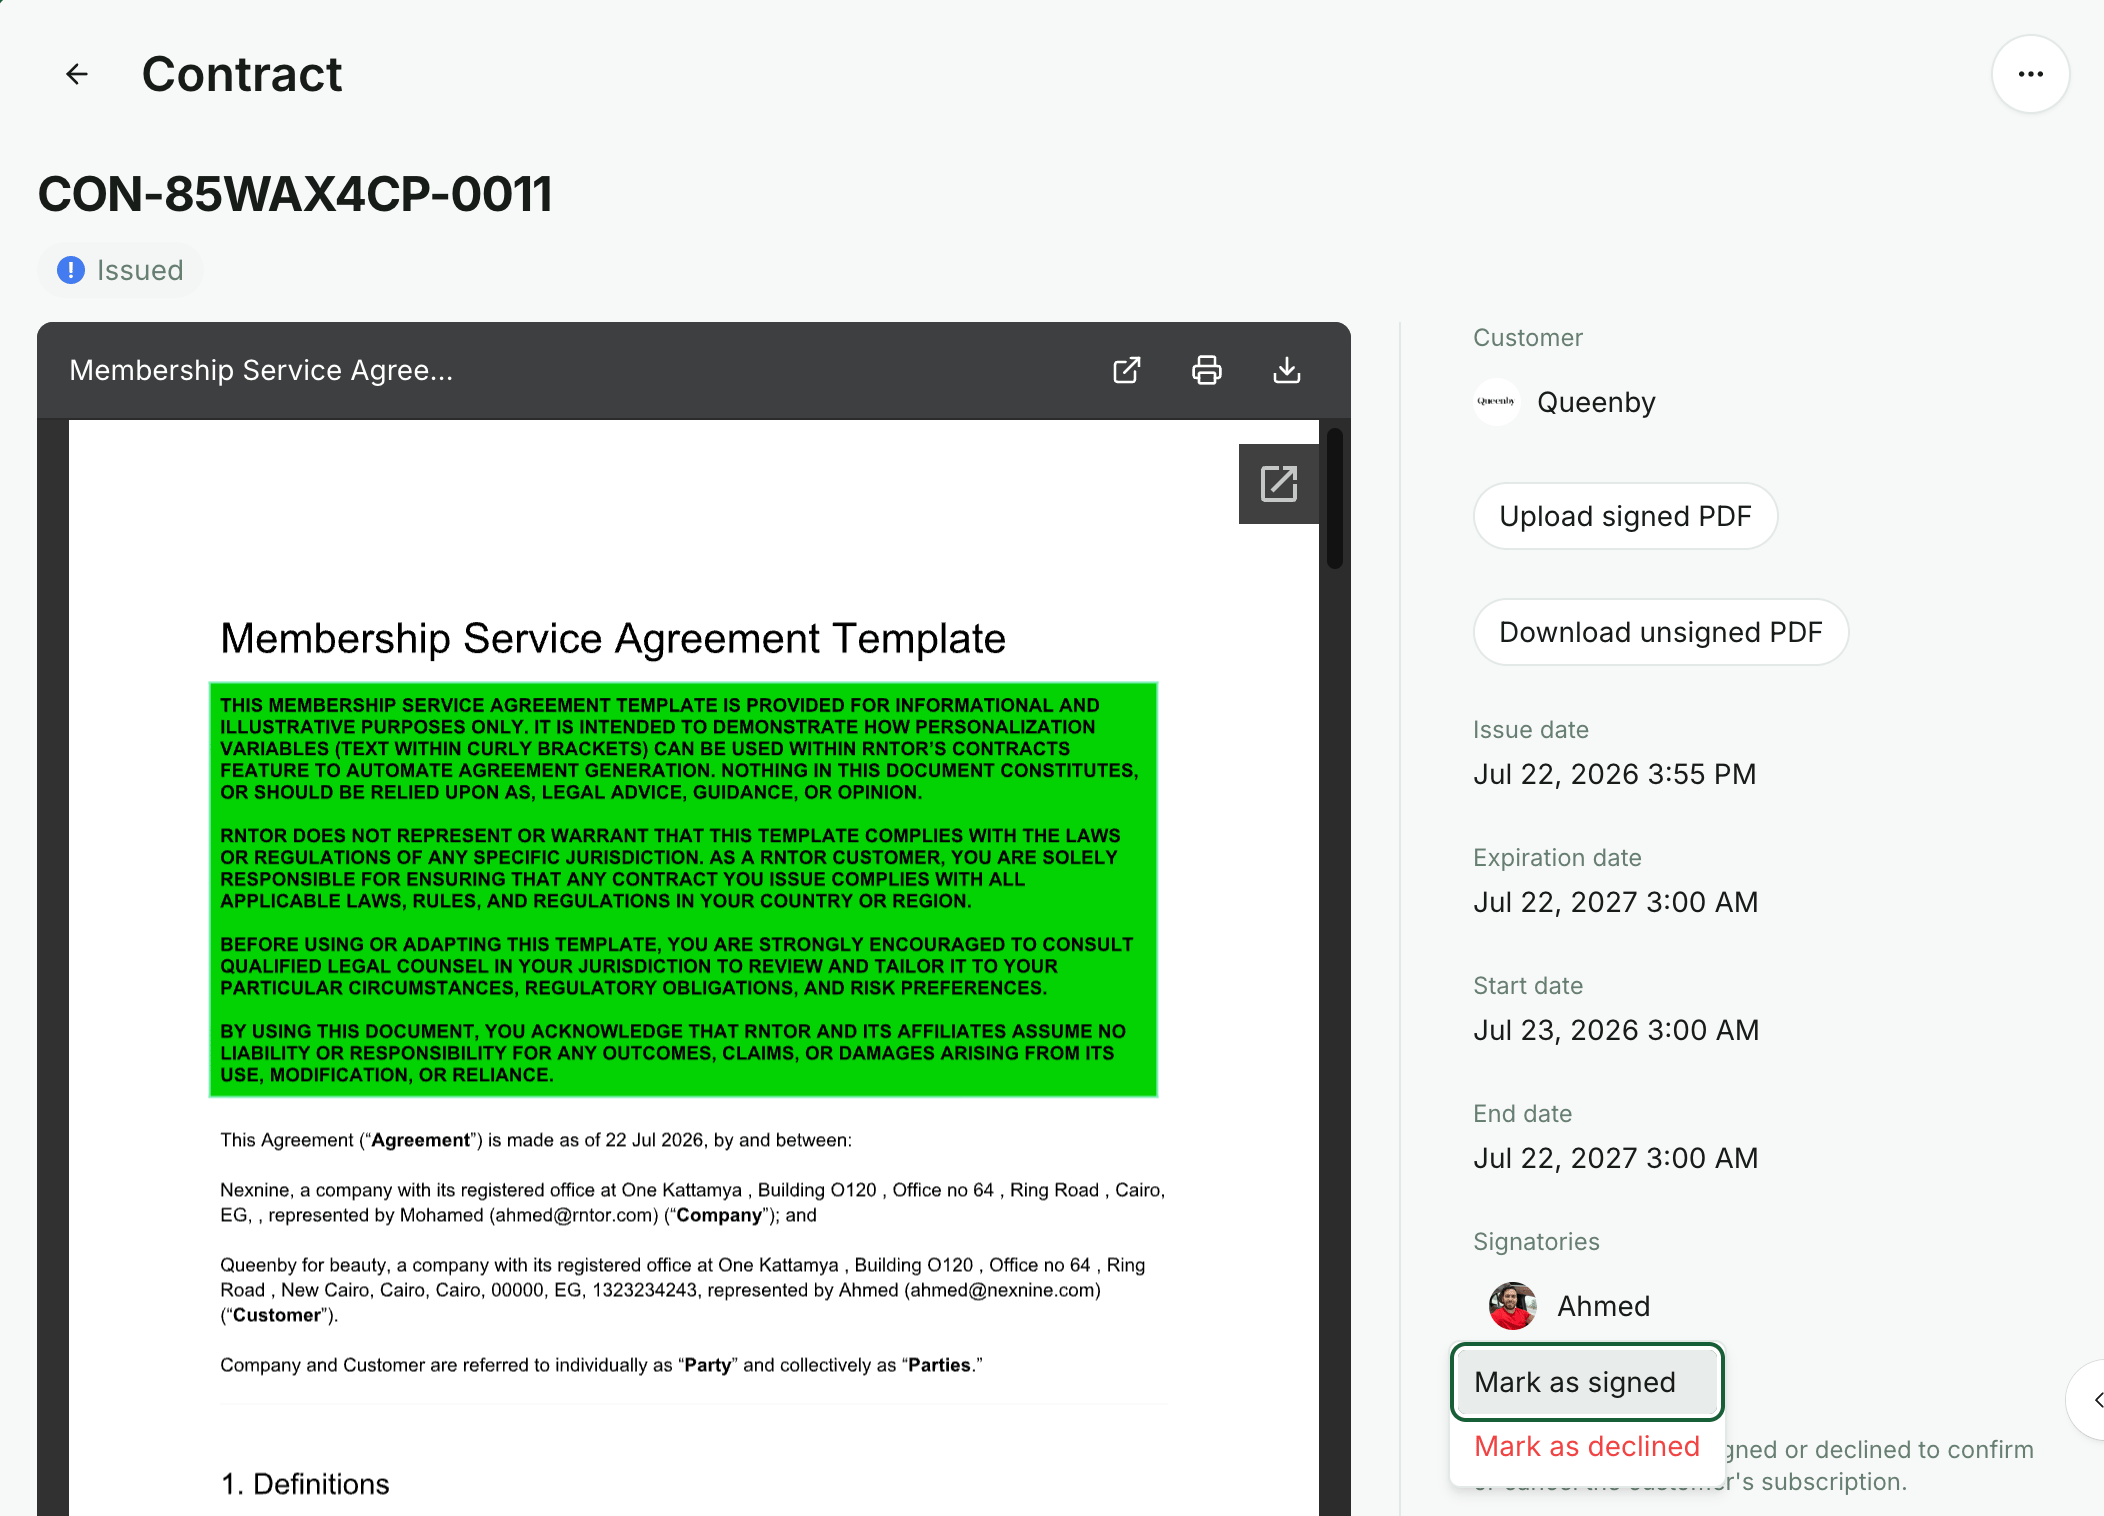 4. Press `Upload signed PDF` to upload the final signed document.
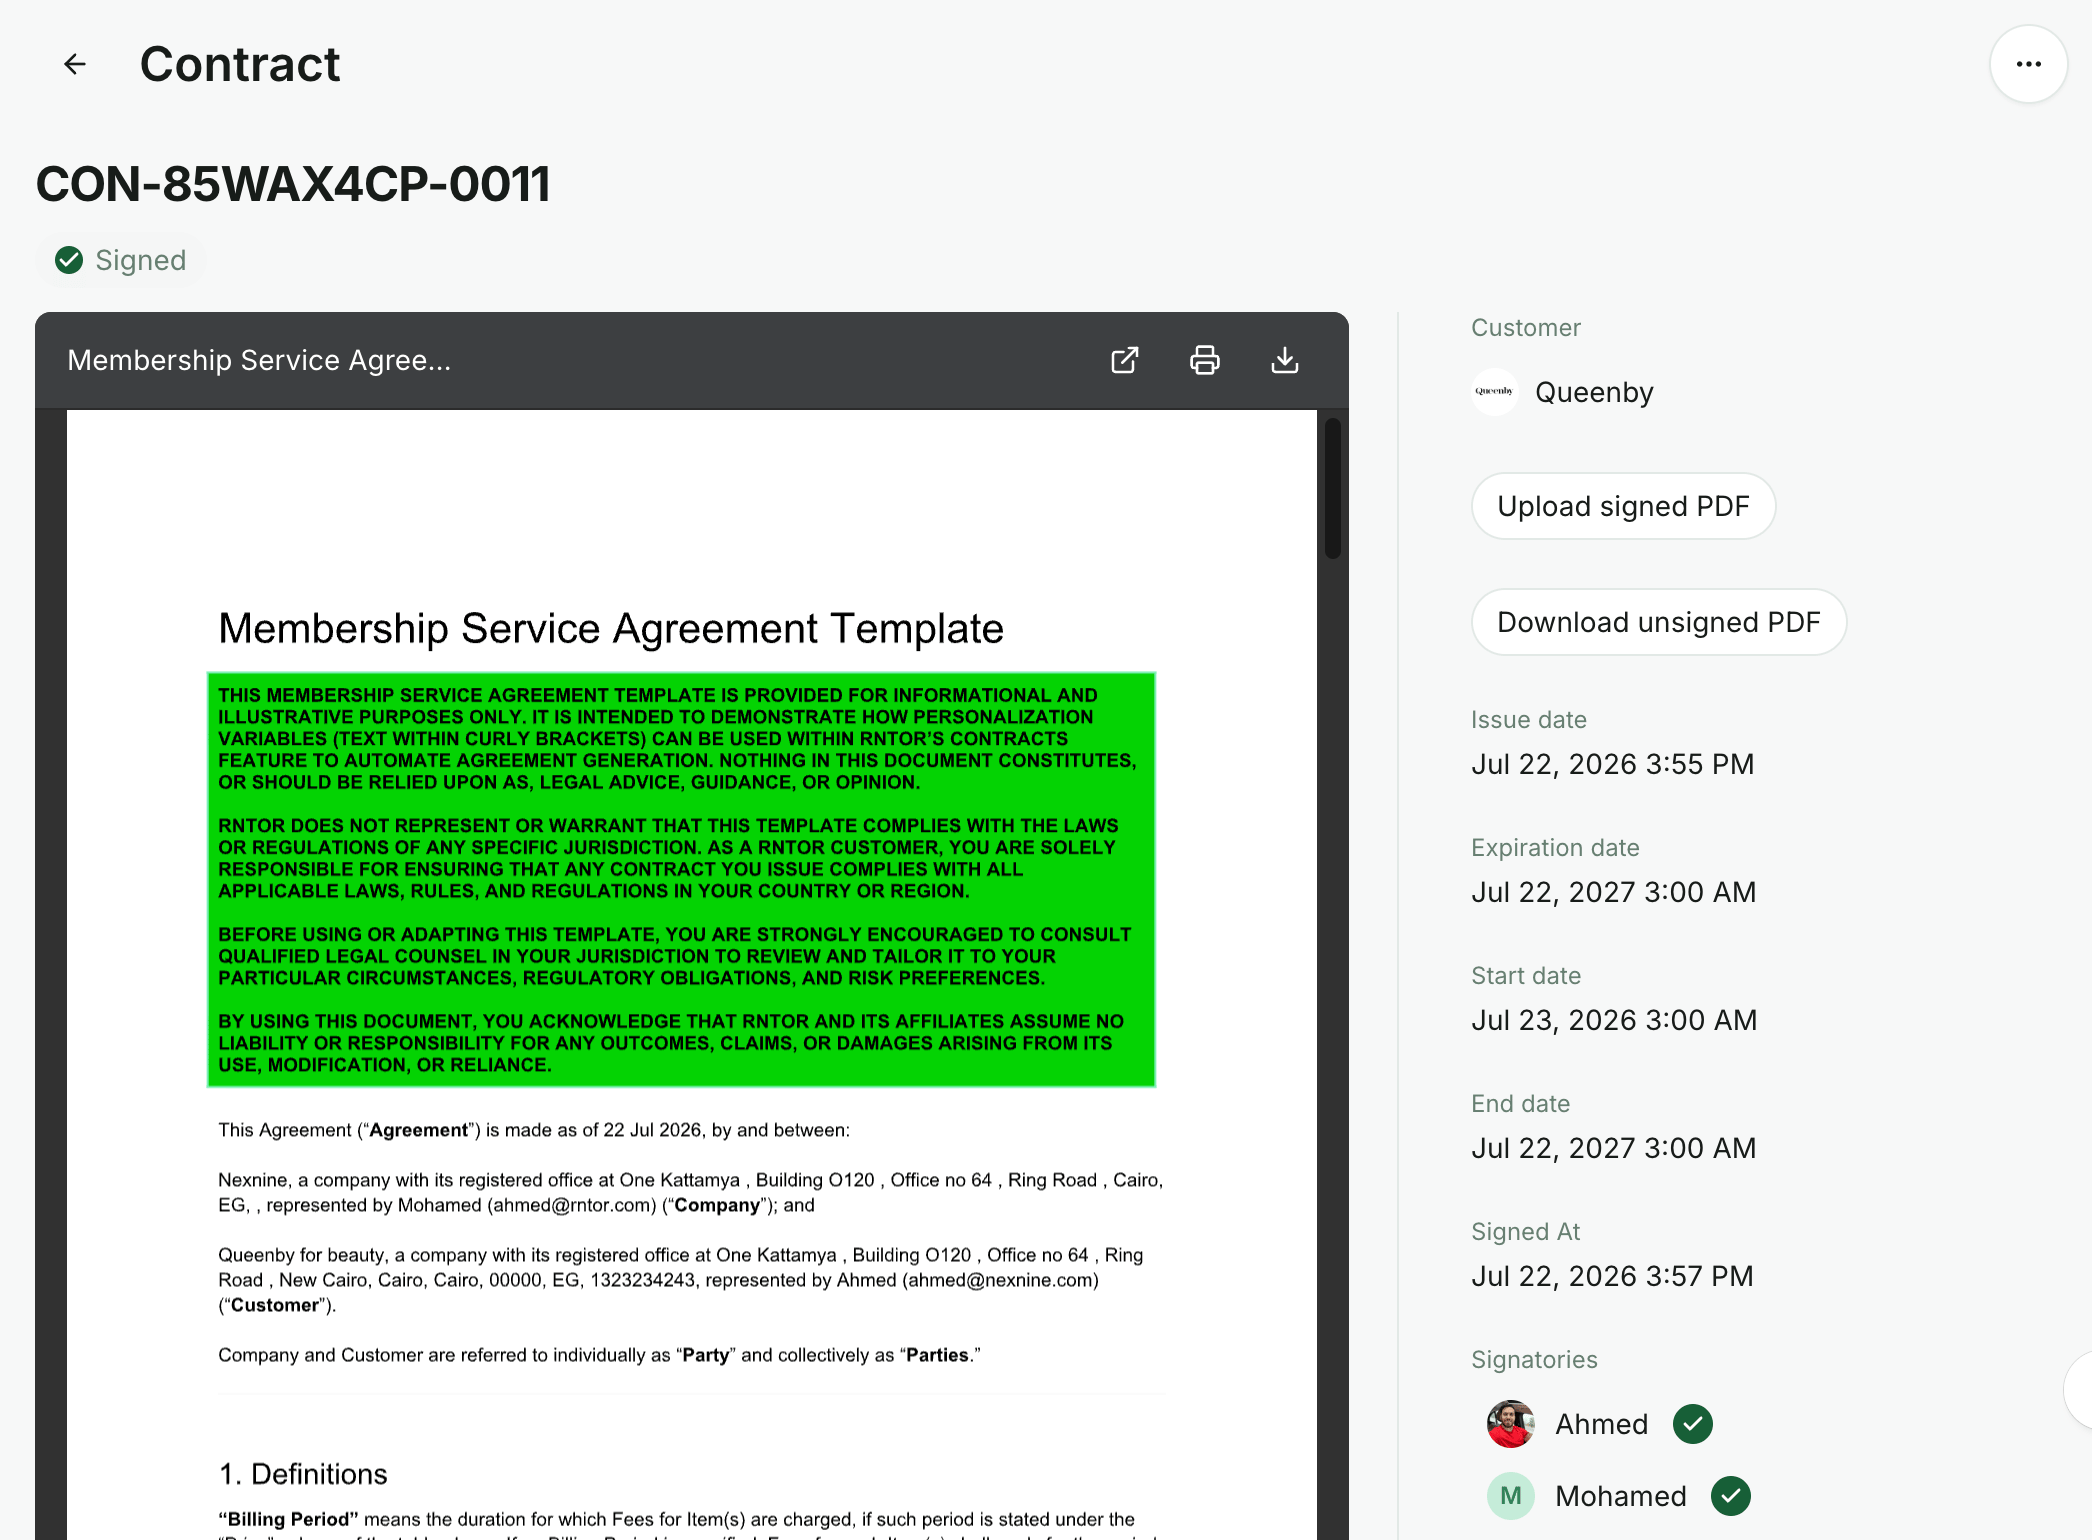 When the contract is marked as signed by all signatories:
* The contract status changes to **Signed**.
* The system automatically creates the customer’s subscription on the selected start date.
* The system [notifies](https://www.spacebring.com/docs/member/account/notifications) the customer.
If any signatory declines the contract:
1. Press the **(...)** menu next to the signatory’s name.
2. Select `Mark as declined`.
The contract status changes to **Declined**, and the customer’s subscription is not created.
## FAQs
RNTOR uses BoldSign as its eSignature provider. Electronic signatures are legally recognized in most countries, but the specific requirements, accepted signature types, and validity for particular document types vary by jurisdiction. Before relying on eSignature for a given contract, check BoldSign's country-by-country legality guide: [https://boldsign.com/electronic-signature-legality/](https://boldsign.com/electronic-signature-legality/). For regulated documents or cross-border agreements, we recommend obtaining independent legal advice to confirm that an electronic signature satisfies the applicable local requirements.
When a contract has more than one signatory, RNTOR signs sequentially through BoldSign in the signatory order defined on the contract. Only the current signer receives the signing email; the next signer is emailed automatically after the previous signer completes signing. If an earlier signatory has not signed yet, the document will not appear in later signers' inboxes.
If the previous signatory has already signed and you still don't see the email:
* Confirm the contract was issued with **Issue with eSignature** (not just **Issue**). Only that action sends the request to BoldSign.
* On the contract page, verify the signatory's email address is spelled correctly.
* Check that the previous signatory's status on the contract is **Signed** — if it is still **Pending**, the next email has not been triggered yet.
* Look in your spam/junk folder and any inbox rules or filters that could divert the message.
To keep signatures in their designated positions and prevent an additional signature page, include both the signature and signature-date placeholders for every selected signatory:
`{customer.signatory.signature}`
When the contract is marked as signed by all signatories:
* The contract status changes to **Signed**.
* The system automatically creates the customer’s subscription on the selected start date.
* The system [notifies](https://www.spacebring.com/docs/member/account/notifications) the customer.
If any signatory declines the contract:
1. Press the **(...)** menu next to the signatory’s name.
2. Select `Mark as declined`.
The contract status changes to **Declined**, and the customer’s subscription is not created.
## FAQs
RNTOR uses BoldSign as its eSignature provider. Electronic signatures are legally recognized in most countries, but the specific requirements, accepted signature types, and validity for particular document types vary by jurisdiction. Before relying on eSignature for a given contract, check BoldSign's country-by-country legality guide: [https://boldsign.com/electronic-signature-legality/](https://boldsign.com/electronic-signature-legality/). For regulated documents or cross-border agreements, we recommend obtaining independent legal advice to confirm that an electronic signature satisfies the applicable local requirements.
When a contract has more than one signatory, RNTOR signs sequentially through BoldSign in the signatory order defined on the contract. Only the current signer receives the signing email; the next signer is emailed automatically after the previous signer completes signing. If an earlier signatory has not signed yet, the document will not appear in later signers' inboxes.
If the previous signatory has already signed and you still don't see the email:
* Confirm the contract was issued with **Issue with eSignature** (not just **Issue**). Only that action sends the request to BoldSign.
* On the contract page, verify the signatory's email address is spelled correctly.
* Check that the previous signatory's status on the contract is **Signed** — if it is still **Pending**, the next email has not been triggered yet.
* Look in your spam/junk folder and any inbox rules or filters that could divert the message.
To keep signatures in their designated positions and prevent an additional signature page, include both the signature and signature-date placeholders for every selected signatory:
`{customer.signatory.signature}`
`{customer.signatory.signature_date}`
`{location.signatory.signature}`
`{location.signatory.signature_date}`
For additional signatories, use the numbered placeholders:
`{customer.signatory2.signature}`
`{customer.signatory2.signature_date}`
`{location.signatory2.signature}`
`{location.signatory2.signature_date}`
Always include each signature and its corresponding signature-date placeholder together.